 I have tried so many different methods & techniques for installing doors, it really isn’t funny. A couple of years ago, I saw a product called EZ-Hang come on the market, and my first thought was, yeah that’s nice. This is probably just another item for homeowners to buy believing they can do it like a pro. Then it started being marketed to the trades in Remodeling Magazine, JLC, Fine Home Building, etc… and after a while I started wondering, hmmm, I wonder if it really does work?
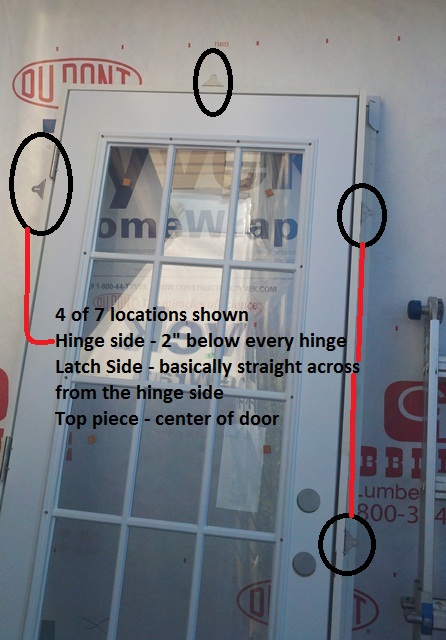
Fortunately for me, they happened to be at last year’s Remodeling & Deck Expo, so I picked up one of their sample packs they were handing out (main picture above). Unfortunately though, I didn’t have a single project involving doors on the horizon so it simply sat in the office for almost 10 months until one came along. After using it that first time, I am actually hooked & have used it now on 8 other doors since then – 4 exterior & 4 interior. (What can I say, when it rains it pours)
The Caveats:
- Yes we are talking about installing pre-hung doors, with all the shipping materials removed & it being ready to be hung
- If there is an existing door in the opening, it has to be removed & the opening is prepped
- We are not talking about installing any trim, locksets, or coping / cutting the jamb if the floor is out of level – this is simply installing the unit in the opening
The tools required:
Per EZ-Hang all you need is a pencil, a level & a cordless drill with a Phillips bit per the ad below… (Fortunately for them & me (?) this wasn’t one of the ads mentioned above or I would have probably kept on thinking it was a gimmick) Ok, moving past the ad piece, you might also find it handy to still have some shims, a Phillips screwdriver & a regular screwdriver. If this is for an exterior door, you will also need a caulk gun, trim screws & appropriate caulking & flashing material.

The steps:
- Assuming your opening is ready, and the floor is level – simply grab a 6’ level & mark a plumb line approx. ½” an inch in from the edge of the stud where the hinges will be.
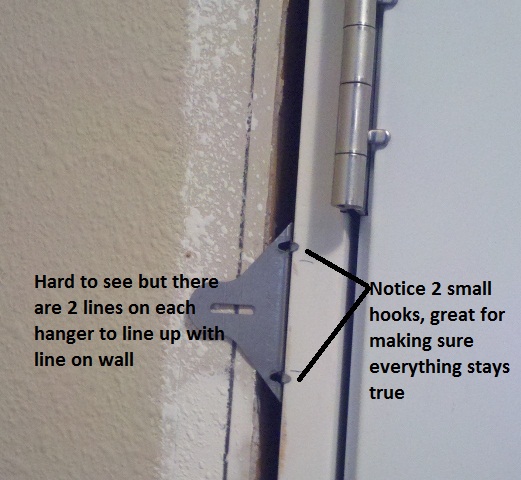
- Install 7 of the hangers with the small screws included – the little teeth are great if you have drywall installed as it will keep you from pushing the hanger to far back on the casing causing issues. (If the drywall is not installed, you will need to slide the hanger back approx. ½ an inch by bending the teeth out of the way)
- On the hinge side approx. 2” below each hinge – this is assuming the door has three hinges, for a hollow core door with only two, place the third in the center
- One in the center of the top (only needed for doors 30” & above)
- On the latch side, I would simply say it mimic the locations from the hinge side but the official measurements given are – 10 to 12” down, 6 to 8 inches from the bottom & 2 inches above the latch (In the case of exterior doors- you can split it like I did or go above the deadbolt)

- FOR EXTERIOR DOORS ONLY
- Back screws on hangers out approx. a 1/4 of a turn & slip hangers off
- Follow door manufacturer’s directions for flashing & caulking
- Insert door into opening from exterior & plumb the hinge side
- Temporarily screw into place using trim screws through brick molding
- Go inside & slip hangers back on (follow instructions below for attaching & squaring unit up & then come back to the next step)
- Open door & remove 1 screw from each hinge & replace with longer screws that should have been included with the door. (Some manufacturers include 4 screws aka 2 for the top hinge)
- Finish attaching exterior brick mold & caulk per manufacturer’s directions & spray low expanding foam around the gap between the framing & casing. QUICK TIP: put a piece of electrical tape over the hole for the deadbolt & lockset before spraying
- FOR INTERIOR DOORS ONLY: Insert door into opening – if you will be installing ceramic tile, hardwood floors or carpet later, shim the hinge side up so that the casing will be just a hair above the finish floor height. Not only does this give a more professional appearance, but it also prevents the door from dragging on the carpet & allowing some air to return to your HVAC unit.

- Starting with the top most hinge align hanger with line & screw in with included drywall screw, followed up by the middle & bottom screws (You may need to bump the door a bit to line it up – thus a shim or screwdriver maybe of help)
- Moving onto the latch side – check the top & side reveal, adjust as necessary & screw in. Follow this up with the top hanger & the remaining 2 hangers on the latch side
- Now all you have left is to test the door, finish out the trim & install the lockset. While mentioned in the Exterior Only part, I would also recommend removing one screw from each hinge & replacing with a longer one (especially if you use solid core doors for the interior like we do).
A few quick notes:
Overall it really is a nice system that works really well assuming the opening & walls are plumb & true. With that said, if you have older plaster walls I wouldn’t be using them (yes even with pre-drilling I wouldn’t try it). For heavier security doors, taller units, etc… it would be wise to check with the manufacturer or at minimum increase the amount of hangers. On the energy efficiency front, I actually give this product two thumbs up as it eliminates numerous problems caused by shims and allows the gap to be fully air sealed. For more information on this product, videos (like the one below), directions, or to order some, you can simply visit their website; EZHangDoor.com.

These are available at Home Depot Stores
NO these are not available at HD they are at LOWES.
These are available at Home Depot Stores
NO these are not available at HD they are at LOWES.