 Lately there have been some interesting discussions on exactly what is required for a duct test, especially as it relates to rough in tests & ducts located outside the conditioned envelope. Many of these problems seem to stem with not only a lack of knowledge of what the codes state but also what the standards are (updated 2009-2015 Duct Leakage Chart). As most building departments don’t have enough inspectors, the time for training, or the equipment to do the tests themselves this verification work is generally handled by others.
Who can test?
For many jurisdictions there are 3 generally accepted groups that can do the testing;
- First off the HVAC contractor may do the verification (generally for only systems they installed & assuming the building department allow it) as long as they have gone through what is called a DET Verifier class. For those taught by Southface, I have no doubt that they were taught properly. Granted many may liken this to the fox guarding the hen house, but if you can’t trust them to do this why did you hire them?
- The second one allows for certified RESNET Raters (like myself) or HESP to perform the tests which many builders (and even many HVAC contractors) elect to do especially if any code tradeoff calculations are required. As RESNET requires a certain amount of Quality Assurance inspections be done, they are generally pretty careful at getting it done right. With that just like anything else there are bound to be a few bad apples or something I see much more often is ones that don’t stay current.
- The final batch is where things get a little stickier as many allow any BPI certified individual to do the test. Unfortunately this is an issue as not only are they not tested on this, but never taught about it unless you are going after their Heating Certification or their new specific Duct & Envelope Test Certification (created in late 2014). When it comes down to questionable practices I have seen & heard from some builders, most seem to fall in this camp.
The 4 most common types of tests:
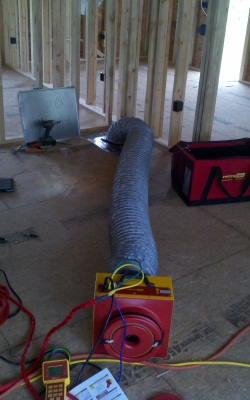
- The “Total Duct Leakage” or “Post-Construction” test involves sealing up all the registers in the house, hooking up a calibrated fan and pressurizing the duct system to 25 Pascals (Pa). The maximum leakage allowed per the 2012 IECC is 4 CFM per 100 SF of “Conditioned Floor Area” (CFA) while the 2009 IECC allows 12%.
- The “Rough-In Test” is basically the same as the Total Duct Leakage Test above except this is done before the drywall goes up. The best thing about this test is it allows the contractor to make needed corrections before the finishes are installed and is one of the most popular options. Just like above, the maximum allowed leakage allowed is 4 CFM per 100 SF of “Conditioned Floor Area” under the 2012 IECC while the 2009 allowed for 6%.
- If the air-handler only is not installed a “Rough-In” test maybe still be completed but all the ducts must be in place including the ones that “bolt onto” the air handler. Under the 2012 codes you are only allowed 3% leakage while the 2009 allowed for 4%. This is one you definetly have to check with the Building Department with as some do not allow this test at all.
- The “Leakage to Outdoors Test” is a specialty test that requires one to pressurize the house (using a blower door) & duct system (see above) to 25 Pa & measuring how much CFM of is essentially lost outside. This test was allowed under the 2009 IECC (8% leakage) but is not recognized under the 2012 codes. With that many green building programs like ENERGY STAR (unless the system tests at 4% or less) require it along with certain rebate programs like the one offered by NICOR gas in my area.
 The RESNET “simplified” standards (quoted below) are used by DET verifiers, Raters, ACCA & other organizations were based off of ASHRAE 152 & the ASTM E1554 standards & protocols. One of the main reasons for the “simplified” standards was their practicality in the field as compared to pretending one worked in a lab. One other big reason is that hardly anyone would pass if they are doing a “Rough In Test” especially if the Air-Handler has not been installed yet. In part this is because they automatically are assessed a penalty of 2.5% of the rated CFM’s to the leakage amount. If both items are missing (register covers & air handler), well it jumps to 5%. So a 3 ton unit automatically has 30/60 CFM of additional leakage which would easily push many over the allowable leakage limits especially if one is dealing with the 2012 codes. The RESNET “simplified” standards (quoted below) are used by DET verifiers, Raters, ACCA & other organizations were based off of ASHRAE 152 & the ASTM E1554 standards & protocols. One of the main reasons for the “simplified” standards was their practicality in the field as compared to pretending one worked in a lab. One other big reason is that hardly anyone would pass if they are doing a “Rough In Test” especially if the Air-Handler has not been installed yet. In part this is because they automatically are assessed a penalty of 2.5% of the rated CFM’s to the leakage amount. If both items are missing (register covers & air handler), well it jumps to 5%. So a 3 ton unit automatically has 30/60 CFM of additional leakage which would easily push many over the allowable leakage limits especially if one is dealing with the 2012 codes. |
The Codes:
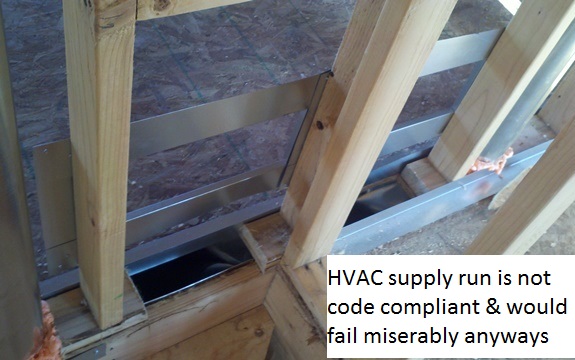
While many claim the codes can be confusing, the codes are pretty clear & simple on what the requirements are. Whether you are following the 2009 or 2012 codes, all joints & seams must be sealed no matter what their location is. Both require testing as we listed above & detail below. The biggest change between the two codes besides the allowable limits is the use of building cavities which the 2012 codes completely ban. Another interesting piece in the 2012 codes is a requirement that the manufacturer of the air handler tighten up their systems which many have already started doing. Below is a copy of the codes taken directly from the code books & only slightly modified for ease of reading (unless reading metric is easier for you).
 2009: N1103.2.2 Sealing (aka 403.2). Ducts, air handlers, filter boxes and building cavities used as ducts shall be sealed. Joints and seams shall comply with Section M1601.4. Duct tightness shall be verified by either of the following: 2009: N1103.2.2 Sealing (aka 403.2). Ducts, air handlers, filter boxes and building cavities used as ducts shall be sealed. Joints and seams shall comply with Section M1601.4. Duct tightness shall be verified by either of the following:
1. Post-construction test: Leakage to outdoors shall be less than or equal to 8 CFM per 100 ft2 of CFA or a total leakage less than or equal to 12 CFM per 100 ft2 of CFA when tested at a pressure differential of 0.1 inch w.g. (25 Pa) across the entire system, including the manufacturer’s air handler end closure. All register boots shall be taped or otherwise sealed during the test. 2. Rough-in test: Total leakage shall be less than or equal to 6 CFM per 100 ft2 of CFA when tested at a pressure differential of 0.1 inch w.g. (25 Pa) across the roughed in system, including the manufacturer’s air handler enclosure. All register boots shall be taped or otherwise sealed during the test. If the air handler is not installed at the time of the test, total leakage shall be less than or equal to 4 CFM per 100 ft2 of CFA. Exception: Duct tightness test is not required if the air handler and all ducts are located within conditioned space.
1. Post-construction test: Total leakage shall be less than or equal to 4 CFM per 100 SF of CFA when tested at a pressure differential of 0.1 inches w.g. (25 Pa) across the entire system, including the manufacturer’s air handler enclosure. All register boots shall be taped or otherwise sealed during the test. 2. Rough-in test: Total leakage shall be less than or equal to 4 CFM per 100 SF of CFA when tested at a pressure differential of 0.1 inches w.g. (25 Pa) across the system, including the manufacturer’s air handler enclosure. All registers shall be taped or otherwise sealed during the test. If the air handler is not installed at the time of the test, total leakage shall be less than or equal to 3 CFM per 100 SF of CFA. Exception: The total leakage test is not required for ducts and air handlers located entirely within the building thermal envelope. R403.2.2.1 Sealed air handler. R403.2.3 Building cavities (Mandatory). |
 2012: R403.2.2 Sealing (Mandatory). Ducts, air handlers, and filter boxes shall be sealed. Joints and seams shall comply with either the International Mechanical Code or International Residential Code, as applicable. Duct tightness shall be verified by either of the following:
Ducts located outside the conditioned envelope:
One of the best things to come out of the required testing of ducts is that many builders started re-evaluating where their ducts are located & they started moving them all inside the conditioned spaces of a building. While one would think that there wouldn’t be any confusion on the terms “entire system” unless “located entirely within the building thermal envelope” or “if the air handler and all ducts are located within conditioned space”… there apparently is. No matter which code book you are using, both require the entire system to be located in conditioned areas or the entire system must be tested, not just the part located outside, or any other definition.
What counts as “Rough In”
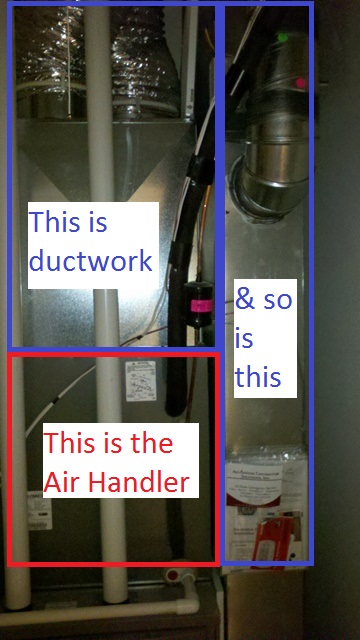
This is a picture of a system that was supposedly ready for a “Rough In” test – can you spot the issue?
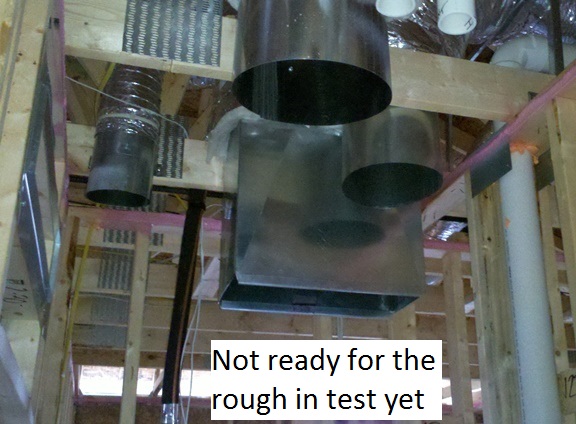
Well the answer is pretty simple as both tests require that all the duct work be installed including the air-handler enclosure. Ahh but wait, both codes allow for testing without the air-handler being installed, right? While that is true, where is the rest of the duct work that is supposed to be there? Here is a photo of what the completed system looks like with the missing ductwork highlighted.
Additions, Renovations, & oh my:
One of the other big issues that comes up revolves around remodeling projects, system change outs, & additions – just when is a test required. Well for this there is no real easy answer as each building department seemingly has their own take on just what a substantial change is. For example I know some jurisdictions that required testing of the entire system when one changed out just the air handler, while others wouldn’t require it unless 50% or more of the duct work was touched, etc… This is one where you are best talking to the local building department & getting their answer in writing. With that we would strongly recommend that one should test every system & fix it up when given the chance – there is no use putting in a new High Efficient unit where the air doesn’t get where it is really needed – i.e. just like throwing a Porsche engine in a Yugo.
|
Prep required:
Total leakage test only: Fully open at least one door, window or comparable opening between the building and outside to prevent changes in building pressure when the duct leakage testing system is running. Leakage to the outside test only: All exterior doors and windows between the building and outside shall be closed, and other openings to the outside that may hinder the ability of a blower door fan to pressurize the building to 25 Pa with reference to outside should be closed or covered in some manner. Interior doors shall be open. Equipment setup:
Conducting the Test:
|
 RESNET Testing Protocol: aka 803.3 Protocol for Preparing the Building and the Duct System for a Duct Leakage Test