 For a mere 162 words, why is there so much confusion on just how much Ice & Water Barrier / Shield (herein called IWS) that needs to be installed? You distill it down to the root and it simply states that said IWS, when required by the AHJ… “shall be used in place of normal underlayment and extend from the lowest edges of all roof surfaces to a point not less than 24 inches inside the exterior wall line of the building“. I know in my training classes I love saying that the code is black, the code is white, and the code has a whole lot of gray mixed in but this one isn’t that hard, is it?
Looking for a quick answer – scroll towards the bottom for the chart in picture form or, download the IWS Chart in PDF. For more on the codes, how to figure this out, and how to get your own number – keep on reading…
 One of the biggest regrets for those that get into the construction fields revolves around math: I wish I would have taken… I wish I would have focused more on… Why? Because every aspect about the trades from excavation to the finishes involves some form of math. Not only does this impact those doing the work, but those associated with it including the planners, inspectors, insurance adjusters, estimators, etc… Fortunately, there is a wealth of tools out there now to help bridge some issues, but if you are not careful it can lead you into costly issues if they are wrong or you input something on wrong. To start this series off I am going to focus on one of the simplest items out there, but one that is often screwed up which happens to be: IWS aka Ice & Water Shield / Barrier that is used on the roof. One of the biggest regrets for those that get into the construction fields revolves around math: I wish I would have taken… I wish I would have focused more on… Why? Because every aspect about the trades from excavation to the finishes involves some form of math. Not only does this impact those doing the work, but those associated with it including the planners, inspectors, insurance adjusters, estimators, etc… Fortunately, there is a wealth of tools out there now to help bridge some issues, but if you are not careful it can lead you into costly issues if they are wrong or you input something on wrong. To start this series off I am going to focus on one of the simplest items out there, but one that is often screwed up which happens to be: IWS aka Ice & Water Shield / Barrier that is used on the roof. |
Oh, come on it’s easy right – oh wait; same exact house & the building inspector says you need 2 rows of IWS installed or it fails & that goes for all roofs. The roofer says 1 1/2 rolls should do it, while the insurance adjuster says they will only allow for a 3′ wide piece after begrudgingly adding it in (amazing how many leave it off). Shoot you use one companies IWS calculator & the answer is wrong as they only account for the 24″ and depth of the soffit… Correct answer on this one – the roofer had it right. So how do you figure out what is really needed – well first a little reading comprehension & a little help with the Pythagorean Theory is in order. Of course, if you want to cheat, as stated above we have a handy sheet at the end.
First: Is it required?
First before going down the rabbit hole let’s be clear, not all areas of the country need to apply IWS or as it is referred to in the code book as an Ice Barrier. With that said, there is nothing wrong with adding it even if you are not worried about ice or even applying more than is called out. I truly have no issues leaving the felt off altogether and just using IWS.
2018 R905.1.2 Ice barriers. In areas where there has been a history of ice forming along the eaves causing a backup of water as designated in Table R301.2(1), an ice barrier shall be installed…
So, if you have no ice issues that means there is no need, right? Umm, not so fast as there are three big exceptions to this:
- Florida: Chance of needing an ice barrier for ice buildup = 0% but roof’s blowing off = big issue. Welcome to the “sealed roof deck” system that mandates that either the whole roof have IWS applied, or all sheathing seams are sealed with a similar material. This has been slightly loosened with the FBC 2020 version for certain areas, but that is going beyond the scope of this piece.
- Manufacturer Requirements: Per 2018 IRC R903.1 all roof assemblies shall be installed in accordance with this code and the approved manufacturer’s instructions… which means that if you are installing let’s say a synthetic slate roof with a 6:12 or lower pitch & they require IWS (which many do) then you better install it. If not, you will probably find yourself responsible for rotted sheathing or worse from pooled water sitting in the nail divots that couldn’t readily drain out.
- Your Building Department or AHJ: They are responsible for adopting & changing the code based on their area, so much like Florida did they can mandate it’s use and other requirements so always double check with them.
Second: 2 Exceptions
There is technically only one exception listed which is: Detached accessory structures not containing conditioned floor area. So just to clear this up as I have heard all of these before: Front porch… required it’s not detached. Dettached garage with any type of cooling or heating system installed… required (With just a ceiling fan or portable heater only is Exempt). Garage attached to the house… required. Storage shed in middle of the yard… Exempt
Hmm, is it required for all types of roofing? Good question and that brings us to another exception that depends on which code book you are on. The 2015/18 version you may notice that standing seam roofs, along with concrete & clay tile roofs are not listed under Ice Barriers, nor does it call out for it to be used under those sections (though if the manufacturer says…) Still on the 2012 or earlier version (& as I recall it has been this way since the 2000 version) do not list specific roofing types so all apply.
Determining amount:
Ok, so you need to install it and you will see that there are 3 parts to this. The first is it must start at the lowest edges of all roof surfaces (A). While I would love to say this is simple, we have had 2 articles dealing with just this issue before. Just to reiterate it doesn’t stop at the edge of the roof sheathing (unless the sheathing overlaps the fascia) but extends out to the far end of the fascia or in case of “wooden drip edge” to that point (in fact as a best practice it should wrap over it by 3/4 of an inch at minimum).
The second part is easy as it gives a rock solid number – to a point not less than 24 inches (B) but then we hit the kicker inside the exterior wall line of the building (C). In the older code books, they used to have a nice diagram that showed what this meant but you won’t see that diagram in the latest versions. In essence you have to measure out 24″ from the interior finish material which is normally drywall.
Enough words – how about a picture to clear things up?

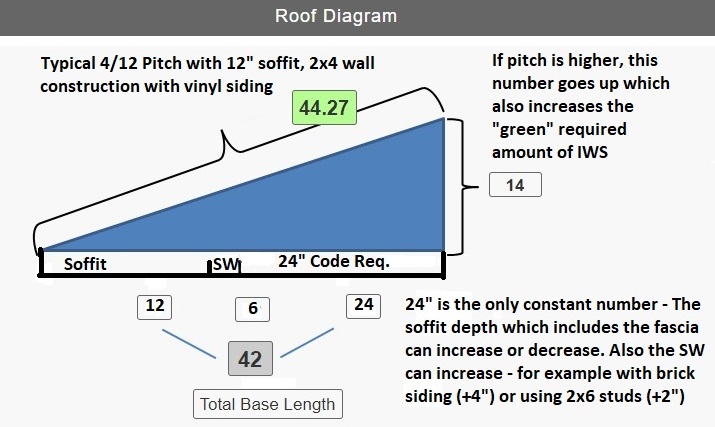
So, part A truly is easy – what is the overhang depth from the siding to the outside part of the fascia aka soffit area? In this case – 12″. Part B is easy as no measuring is involved – 24 inches. Part C (listed as SW above) depends on the wall – in this case we simply listed it as 6″ based on the wall specs. You can also measure the door jamb from the interior to the exterior finish So, all you need is 42″or 3′ 6″ right? No, as that point 24″ inside must translate to the roof above so you actually need 44.27″ which equates to a tad over 3′ 9 1/4″. So how do you figure this out besides standing inside & drilling a hole straight up – well it is called the Pythagoreion Theory.
 For many in the trades nothing beats a Construction Master Calculator. A quick way to get the number you need is to type in the length (42) press “Inch” & then press “Run“. Next simply type in the roof pitch (4) press “Inch” & then press “Pitch“. Now simply press “Diag” and you have your number 44 1/4″ – want it in Foot & Inches – just press “Feet” & voila it comes up at 3′ 8 1/4″ For many in the trades nothing beats a Construction Master Calculator. A quick way to get the number you need is to type in the length (42) press “Inch” & then press “Run“. Next simply type in the roof pitch (4) press “Inch” & then press “Pitch“. Now simply press “Diag” and you have your number 44 1/4″ – want it in Foot & Inches – just press “Feet” & voila it comes up at 3′ 8 1/4″ |
The What & How?
The Pythagoreion Theory or Theorem as it applies here states that the length of the hypotenuse (aka the amount of IWS that is needed which equals 44.27 in example above) is equal to the sum of the other lengths squared. The Pythagorean equation: A² + B² = C²
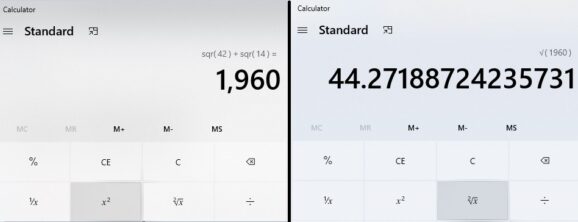
Ah but all I can easily figure out is bottom length (A) – how do I get the height (B)? That part is actually easy, if you know the slope of the roof. A 4/12 pitch means that for every foot, the rise is 4″. So using the 42″ above that equates to 3.5 feet or a 14″ rise. So 42² (1764) + 14² (196) = 1960 (shown on the left below). Take 1960 & hit the square root key & you get 44.27″ (shown on the right below). 
How much does a roll cover?
I know, you can’t simply buy a 44.27″ roll as it typically only comes in 3′ (36″) width. Heh, that is at least one reason many Building Inspectors simply just state, “you must install 2 rows minimum”. But wait can’t I just???
With this math & a little common sense you know that you need a row & half of IWS before continuing with felt. Why half & not just cut a roll down to say 9″? First because you need at least 2″ or 3″ inches of overhang over the lower course (depends on manufacturer) so now you basically need a 1′ strip, but… While some manufacturers are mum on cutting diagonally some are against it unless you are following the split created by the pull off film. The other issue is you want as straight a line as possible which takes time which means that your last cut piece may not be large enough due to a slip of the knife, etc… so why chance it? Now if you can find a smaller roll that’s great but most roofing supply houses only carry one size so essentially you have only 4 widths to play with: 36″ 1 roll / 51 to 52″ a roll & a half / 69 to 70″ 2 rolls / 70″+ 2+ rolls
Putting it all Together:
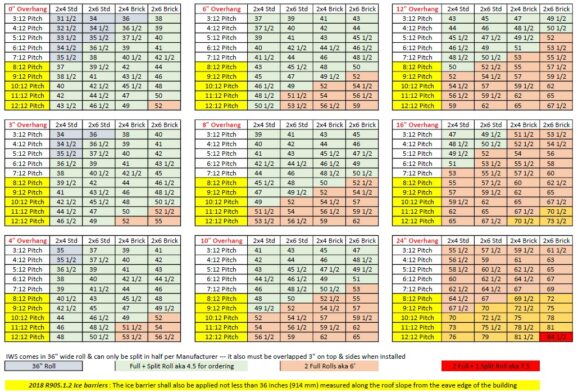
So now we know the math for what is needed, even determined how many rolls so we are good to go. Yeah, but who wants to do all that math each time, or what happens if your battery dies, or your smart phones calculator isn’t so smart? Well, we have you covered with the following chart (click to go full) where we took the most common overhangs, roof pitches, and the 4 most standard wall configs. We also have a PDF download to save it to your phone or…
To make it even easier, we also color coded it for how much IWS rolls you need. But wait, what is this yellow section in the pitch area for?
IWS & Rakes:
Starting with the 2015 IRC another 42 words got added to the 2012 version & it goes like this: “On roofs with slope equal to or greater than eight units vertical in 12 units horizontal (67-percent slope), the ice barrier shall also be applied not less than 36 inches (914 mm) measured along the roof slope from the eave edge of the building.” Pretty simple but also easily forgotten especially if you are working in multiple jurisdictions on varying code versions. Best practice – do all your roofs based on the newest code version.
Xactimate & Insurance:
 Insurance companies can be so much fun to work with – some with special calculators, policies that they can never show (as they are verbal only), and the list goes on & on. Many issues can be cleaned up with showing them the numbers (i.e. the sheet above) but how about calculating it in Xactimate? I know in older versions it was easy to say “(EAVE*3)+(VAL*3)” but now it doesn’t appear that “EAVE” is a Primary Variable so that is out.
One trick is assuming you are using EagleView, Hover, or some similar program is to use the same variable above but replace “EAVE” with the number listed on the report. Need to add the “RAKE” in – simply add in “+ (RAKE*3)” into the equation with the amount of rakes that qualify. Ahh noticed the “VAL*3” in there? Well that is because valleys have 3 options depending on how they are done with one option being to use IWS in them. The nice thing – VAL is a primary variable so as long as you completed or imported the sketch it will auto-calculate that variable for you.

