 As a quick recap, in our last article in the Going Off Grid series we covered the “harvesting” portion of a rain water system. In this case the field aka the roof or collection area and the roads aka the gutters or conveyance system. Just like any harvest though, you only want to harvest the crop & not the stalks. Fortunately for us, we don’t require huge combines which can easily cost hundreds of thousands of dollars, but just a few simple items that are really quite inexpensive.
In the immortal words of W.C. Fields, “I never drink water because of the disgusting things that fish do in it.” While we don’t have fish to worry about, we do have leaves, branches, pollen, dust, & birds to worry about (aka the stalks). This brings us to the intake component which covers two important issues before the water even enters the tank, pre-filtering & handling any overflow. While there are numerous options, we are going to simply concentrate on 4 of the most common.
The Basic:
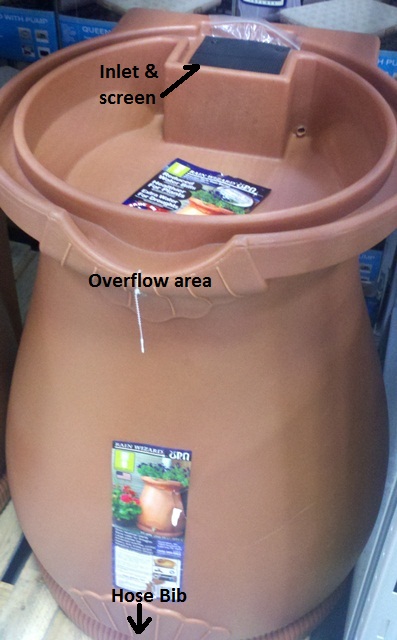 Starting off with the most basic; this is a commercially available rain barrel which simply uses a screen to prevent leaves, twigs & granules from getting in. The water simply runs down a rain chain or the downspout to within a few inches of the opening. While this screen is more than adequate for a gardening only scenario, there are a few caveats that you need to consider; the first one is you have a ton of water dumping into one spot and splashing back at your house which is not good. The second issue is the overflow area is simply allowing the water to run down the barrel, onto the ground right beside your house.
The second issue can be easily addressed by placing it on blocks and making sure the ground slopes away from the house. The first issue however, is a little more problematic & can only really be solved by moving the barrel out away from the house or using splash guards. I must emphasize that whatever you do, do not take off the screen & run the downspout directly into the barrel. Not only will this cause issues with mosquitos but it can also allow for the water to back up on the roof.
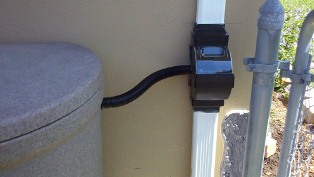 For those interested in a more elegant solution to this, you may wish to look into rain water diverters. This picture is courtesy of Fiskars & is there 5962 Rain Barrel Diverter.
Downspout Diverters / Filters:
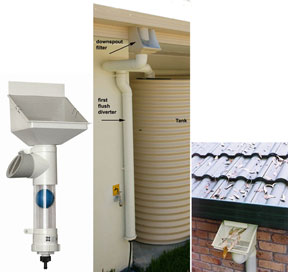 This is a popular item with numerous systems that prevents most leaves & twigs from getting into the downspout. Just like the rain barrel above, you should be wary of splash back issues but more importantly the “overflow” problem with the water splashing out to the ground below. While these are typically located at the gutter downspout, I have also seen where they are mounted closer to the tank.
The one on the far right is the most standard setup which is connected directly to the downspout. The other two show a first flush filter installed which gathers the first 10 to 80 gallons of rainwater coming off the roof which theoretically contains all the dust, pollen, and other droppings. Once this dirty water is collected it trips the flush out and closes the diverter allowing the “clean” water to flow into the tank.
In Line / Basic Filtration:
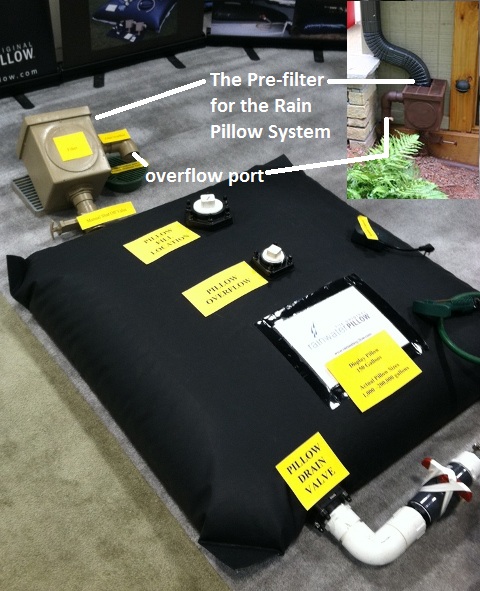 This picture is courtesy of Rainwater Pillow & shows what I consider a basic filter along with their system. One of the nice about these is you are not limited to placing the filter directly against a house (with the associated issues) or dealing with cleaning one out that is located above a tank (yes this one does require cleaning as do most others). This one shows the water being directed over the grate to help block the twigs from getting in, and the other debris being captured via a filter pad & swimming pool style strainer basket.
The biggest caveat with this system is the amount of water flowing into it. In a major downpour you may potentially overwhelm the capacity of the PVC pipes and have it overflow the box. If this is a potential issue, you may consider using one for every two or three downspouts depending on the size & potential flow coming off the roof.
Tank Mounted / Advanced Filtration:
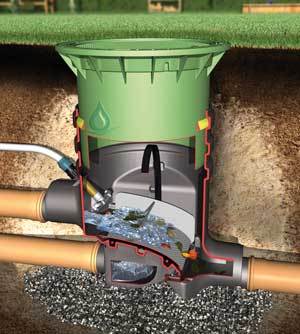
 This picture is courtesy of where Russ Jackson of Rain Harvest Systems from his recent presentation (which was really good, especially the Q&A portion) and one of their many solutions they provide. I know, this one shows an inline underground version but it is very similar to their tank mounted version and was chosen mainly for its clarity. This particular one shown filters out items larger than 5 microns and is also self-cleaning with a hose backup.
Sediment:
While we are going to cover the tanks in the next article there is one last important item that comprises the intake & that is how we put the crop away. In the case of water, there is always going to be some sediment in the tank. If you doubt that, please go flush your water heater – no worries, I’ll wait… In all seriousness, in order to prevent the sediment that is in your tank from being stirred up, you need to either create or buy a calming inlet. While buying one is easy & cheap enough, with a section of PVC pipe and 2 sweeping 90’s you can easily create your own for about $5. Simply have the entry pipe extend towards the bottom of the tank (within a few inches is generally fine) & create a J with the two 90’s – glue it all up & now you have a calming inlet. I would have said a U but the inlet doesn’t require that much height.
Additional Info & Websites:
- Alabama Cooperative Extension (Rain barrel basics with a ton more great pieces on left)
- Roof Drainage, Gutter, Down Spout, Pipe Sizing calculators & info (By Ken Sutherland of Australia – might be in metric but a great resource)
- The Rain Water Pillow System
- Rain Harvest Systems Catalog
- HTRC: Off Grid Living Series, Rainwater Systems
