OFT or Optimized Framing Techniques is taking the best framing techniques that fit the house you are building & utilizing them to not only save resources but to also have a strong, durable structure that uses a minimal amount of connectors. Ah, but isn’t that what one might call OVE or Advanced Framing? Well before we get to some of these techniques, let’s look at that.
OVE & the case for:
As many may know, I am not a huge proponent of OVE or as they now like to call it “advanced framing”. I know what’s not to love; you use less lumber which helps reduce thermal bridging and allows for more insulation to be placed in the wall assembly. Shoot it easily works out number wise – a typical wall assembly has a Framing Factor of 25 while an OVE wall will typically be around the 17 – 19% mark which in turn means a standard 2×4 wall now goes from having an overall value of R10 to R12.
The Issues:
As a reminder, OVE stands for Optimum Value Engineering which as I recall, started coming to the fore towards the late 90’s (even though many started advocating it in the late 70’s / early 80’s). The primary focus was to reduce lumber usage and this was accomplished mainly by using single top plates, linear load paths (aka in-line / stack), reducing jack studs, etc… Ah, but then the codes started changing &/or you might be building in a seismic or wind zone and instead of trying to see what tweaks should be made to that engineering, the engineers simply turned to engineering a host of anchors & fasteners to support that system.
Outside Corners:
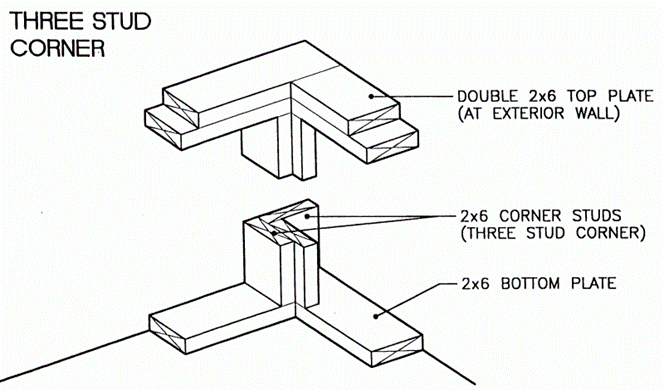
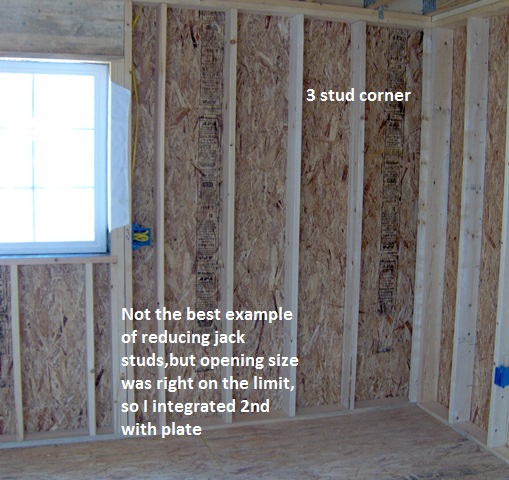
One of the best things to come from the OVE movement is the three stud corner. Typically framers would use 5 to 6 studs to do a corner which never got insulated. By using the three stud corner one can now insulate the corner & there is no structural loss. The only caveat to this is in seismic & wind zones that require specialty tie downs & anchors that attach to a doubled 2x. In many cases a quick check with an engineer or architect can result in a modified 3, using squash blocks or possibly moving the anchors location. As for the two stud corner with drywall clips – did these guys ever have kids? (Image Courtesy of http://et.byu.edu)
Headers & Jack Studs:
By eliminating a the jack studs & using a hanger header… you create a ton of problems. Not only do you have to frame the opening larger because of the hangers in the way (which cost roughly the same price as lumber); you now only have the “king” stud to attach your window or door to, the opening is no longer as strong (see below), but you now have also created an issue with trim work & electrical. It is best to keep the jack stud.
Eliminating Headers:
By eliminating headers in non-load bearing walls… is definitely worth considering for interior walls. For exterior walls though, there are a few caveats & that relates to finishes & the future. What happens if someone wants to hang some heavy drapes on an exterior gable wall – if there isn’t a header, will they be able to do so? How about installing an awning – just because there are trees there now, doesn’t mean they will always be there.
Header Size & Cripples:
Depending on the size of the opening one, one’s header size is determined. Personally I don’t care about the size & use one size (dependent on wall height) for the project which eliminates the use of cripples. Not only does this save time but it also eliminates the issue with getting that area properly insulated, especially when you use an insulated header (see above).
Cripples for windows:
It never ceases to amaze me how cripples / studs are used under windows – all you need to do is have one where the layout calls for. You can either shoot two nails in from the jack side (before the king goes in) or consider using a small hanger underneath to help hold the plate in place if need be. Just remember the load is being carried & displaced by the header above & all the cripples are for is to attach your drywall & sheathing to.
Interior wall connections:
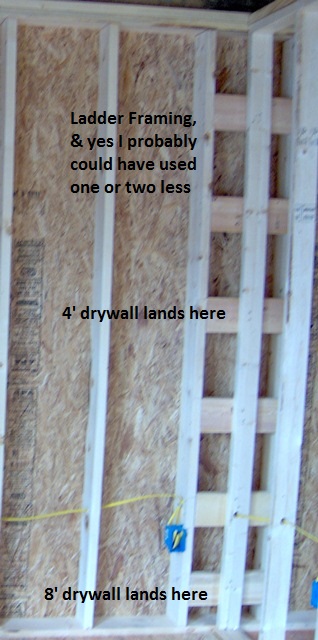
 Another great item that has come about from OVE is the “ladder” which allows for that area to be insulated instead of leaving a pocket to the exterior which was hardly ever insulated. With that, there is a caveat & that is for those installing “batt” insulation which to put it mildly will be a nightmare to install properly. Ah, how about the T style where one uses a size larger 1x behind the 2x – while this does make it easier for batt insulation to be installed, you won’t have the same strength in that corner and you have a minimal amount of room for the drywall screws.
Just like anything else you may see or hear about – remember that the whole house & all the components rely on each other and cause a ripple effect down the line. In our next piece we will take a look into spacing, sheathing, using engineered lumber, and other items that also play a major part.


Thank you for posting the information in re to Thermal Bridging. Build Green, Scotty
My pleasure & I hope you find the next one helpful and business has been booming
I approve of the ladder system and have used it- lastly in the “Benton Rehab Project”. (there is always left over scraps to utilize) I know you’re pretty hip to advanced framing. Have you ever checked out the drywall corner tabs? They keep the insulation from being compressed and loosing its ‘fluffiness’ that ensures proper Thermal Protection. http://apps1.eere.energy.gov/buildings/publications/pdfs/building_america/ns/b4_advanced_framing.pdf
Very cool & glad to hear you like – as for the clips, I really don’t have much use for them as I mentioned above in outside corners section. Not only is this because of the durability stand point, but also from a resource standpoint.
Being a careful builder, I don’t have much sympathy for the thought that pockets and corners using the conventional methods hardly ever get insulated. My consideration is that this detail is part of the craft and planned negligence has no place in deciding which building practice I chose!
Thanks for jumping in & forgive me if I am slightly confused by the comment – the original reason for the 5 to 6 studs was structure & came out before insulating became a standard part of building.
While I have no sympathy for the builders failing to do their job properly – I got to have some for the poor homeowners where there is no simple or cheap fix to it. With that said I know how easy it is to overlook that item along with a 1001 different ones so it is nice to be able to help them avoid it while at the same time making sure they know the pros & cons of each choice.
Congrats on being a careful & I take it conscientious builder – it can be a big selling point. Mind me asking which company you work for / own?
Learned the framming trade in the northshore Boston area in the 80’s. Worked with tradesman who were at retirement age at the time. They communicated to me that there was nothing new under the sun. Every framming possibility had been lived out by them in their long careers. My experience was limited because being from inland Maine where there was no carpentry trade,new hires would show up with a ballpeine hammer and a meat saw. Of most importance of what I learned from the older tradesman was a professionalism that went beyond mere tricks of the trade and an integrity that builds from the bottom up with proper tolerances that produce work that stands the test of time. As is, I am self employed doing small jobs now in Central Maine and having just discovered the internet am aware that some of my knowledge is outdated. Am anxious to come up to speed, so am appreciative of what I am finding on these blogs.
Well welcome to the internet & I am glad we could add to your learning. With you having been in the trades for so long let me quickly add, just temper what you may see on the internet with your past knowledge & experience – challenge what you see, thinking about the proper tolerances, the climate you are in & will that last for more than 30 years. If I can ever help answer a question, etc… just shoot me an email & I do wish you the best of luck
Well welcome to the internet & I am glad we could add to your learning. With you having been in the trades for so long let me quickly add, just temper what you may see on the internet with your past knowledge & experience – challenge what you see, thinking about the proper tolerances, the climate you are in & will that last for more than 30 years. If I can ever help answer a question, etc… just shoot me an email & I do wish you the best of luck