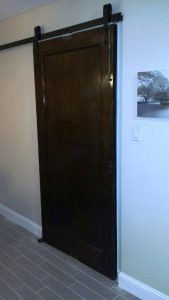
 It seems one of the biggest trends lately is installing a “barn door” inside to either add a decorative element, add some privacy, or in our case cut down on noise. We recently removed a pocket door and left the doorway open as we knew we were going to install one in that location. Here is a brief synopsis of what is involved & lessons learned.
Look Around:
It seems like everywhere you turn there are 6′ kits with even a few 8′ kits out there but what happens if you want one smaller or larger than that? In most cases cutting them down to size is not an option as they have pre-drilled the holes and it might not work properly. Go Custom – always an option but it can be expensive & hard to find the parts you need. In our case we went with Rustica Hardware as you can order them in numerous lengths – 7′ 11″ in our case. Quick Note: You may wish to ask about lead times up front as ours took almost 2 months to arrive due to time of year, etc…
The Kit:
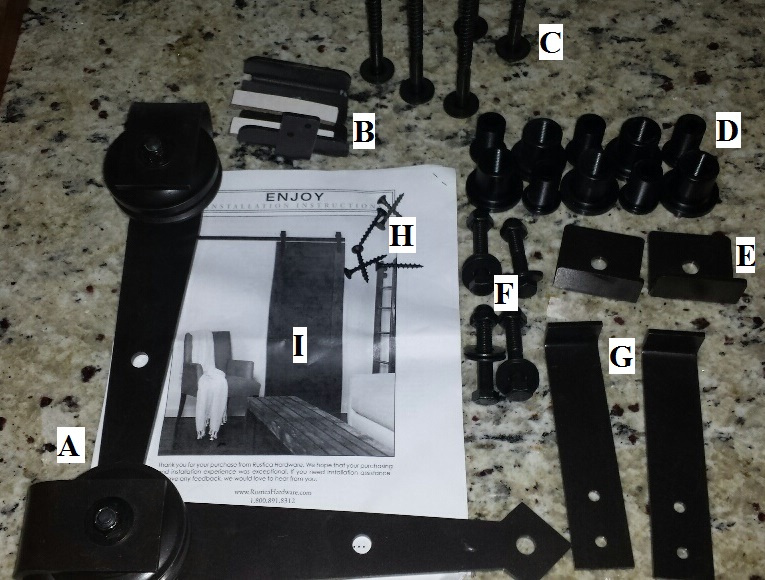
The kit not only came with the pre-drilled track but (A) 2 Hangers, (B) a Wall-mount Adjustable Channel / door guide, (C) 5 Lag Bolts for the predrilled holes in the track, (D) 5 Adjustable Spacers to help hold track out from the wall – they screw together, (E) 2 Standard Stops, (F) 4 Bolts for the hinges, (G) 2 Anti-jump blocks, (H) 6 course thread drywall screws, & (I) the most important piece – the Instruction Manual.
Step 1: Install Hanger on Door
 Depending on where you order your kit, you can also buy a pre-made barn door. In our case we found a door that we liked at a salvage yard in Chicago. 2 or 3 hangers – this mostly depends on the width & weight of the door – around the 4′ mark you are probably looking at needing 3 hangers not only for looks but to handle the weight (especially if it is solid wood style / aka no thin panel)
The Instruction Manual is the most important? Why yes as it tells you the spacing you need for your specific hanger and track to ensure everything lines up properly. This kit does not come with a template & requires specific spacing – 2″ in from the door with a 2 3/8″ gap from the top of the door to the wheel. Quick Tip – trim down a block of wood to give you that spacing & mark your holes accordingly.
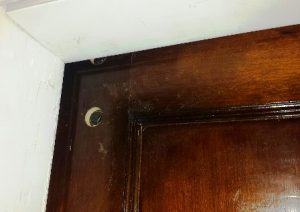
Once you mark the holes you need to drill a 1/8″ pilot hole through the door. On the back side – using a Forstner bit (definitely recommended) drill a hole 7/16″ deep (essentially the height of the head of the bit.) Fortunately they included 4 extra washers so if one hole is a little deeper you can add a washer to the bolt. After this is drilled you should flip the door back over & drill a 3/8″ hole for the bolts.
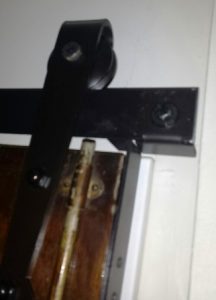
Then all you need to do is place the hanger (A) on the door & insert (F) the bolts with washers through & lightly tighten them. (Heh, directions state 9/16 & 5/8 wrench & socket – try more like a 14 & 16 metric…) Then using your block of wood &/or measuring tape make sure everything lines up & tighten them down. Quick Note: if your door is not larger than the opening than you will be able to see the holes for the bolts as shown above. If this bothers you consider using a plug or epoxy filler.
Installing the Track:
 In our case the directions gave us a formula to follow (2-1/8″ + door height = center of the track). Mark that location on the wall & draw a level line all the way across. Quick Tip: Make sure you measure from the highest point of the floor &/or measure down from the line after marking it to make sure the door won’t get stuck on the flooring. (Yep I ended up running two lines as I forgot the floor was so wacky)
Holding the track up… yeah more like measure the holes on the track & transfer to the wall… (be careful as they may not be exactly the same all the way across especially for custom sizes) drill a 1/4″ hole at each location. Fortunately our wall used to hold a pocket door where they had inserted a header all the way across or we would of had to either done so or attached blocking as needed.
Quick Tips & next steps: Screw together (D) the spacers all the way and then back out X amount of space for any trim + 1/8 of an inch. Once this is done place one lag in the far end & using a ratchet (the 9/16 listed was actually correct) drive it in about an inch – this will give you a way to help hold the track up while attaching the other end. Grabbing one of the spacers (D), the track, & (E) the door stop (they do make a soft stop which looks like a bumper) start screwing in the other side of the track with a (C) lag bolt.
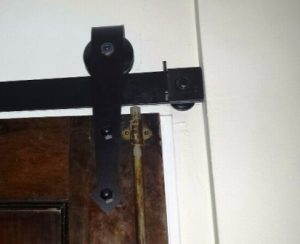 Quick Note: If your door is in the middle of the wall these stops will work great, but if you are like me you might run into issues with the door slamming into the trim before hitting the stops – you can install bumpers on the trim or see below for one final trick I used.
Once the bolt is almost touching the track, take the one bolt out that is holding the other end up & repeat the steps above. For the final three all you need is the bolts and spacers tightening them up till they almost touch the track. Grab a magnetic level & starting at one end tighten the bolts down. Be careful not to over-tighten or you will start sinking into the drywall.
Final Steps:
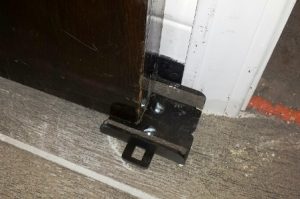 Once everything is secured simply pick the door up & hang on the track. Install the (B) bottom door guide with the (H) drywall screws provided. There are numerous options for this and I selected this type to not only account for the trim but also the tile floor.
The final step is to install (G) the anti-jump blocks with the remaining (H) drywall screws. You should leave approximately 1/8 to 1/4 of an inch gap for this.
 Quick Tip: As you can see by the picture I rotated the stop inwards & down on the opening side so that it would help stop the door before smashing into the trim. I also added some bumpers on the other side to help prevent damage to the trim if we ever opened it that far.

Nice Sean, this info will be very helpful for us, we’ve installed one so far (not happy with the result). Thank you!!
My pleasure Sandy & sorry to hear that – care to mention the issues you had? Stay warm 🙂 & thanks
Hi! I have found the bottom door guides look small online but turn out to be quite large. The one you used looks like the Wall Mount Adj U Channel from Rustica. Is it? If so, is it a big bulky number or smaller? If not, where did you buy yours?
Sorry, about that. I just saw that these are Rustica parts. Still, how big is that floor guide? I have tiled floors as well so can’t do floor mount. Thanks!
No problem & same issue with tile floors for this one – it is 3″ wide & the bottom track goes out to about 3 1/4″ (which is about an inch wide) allowing the adjustment to probably extend out to around 4″ which is probably enough to accommodate 2 doors
How do you cut the track in the bottom of the door?
There is no track at the bottom, just a guide – now if you are talking a regular closet track, with a hacksaw generally
Thanks for the detailed tips, very helpful in preparation for instalingl two barn doors once we can agree on style and price. LOL
https://uploads.disquscdn.com/images/73b1b39e47289386892b2a726c336f21ad8af11e25f9774fa2a7c0c48fd1061c.jpg https://uploads.disquscdn.com/images/09dec85354ce568e30a94ab3a384d3256539f393470b695214b03a7e16f7f6e5.jpg
the hardware that i bought suggested an extra piece of wood to install on the wall before putting the bracket up. Two problems, there is a one inch gap from the door frame and the door is too high off the floor to have the track installed . Help?
Is that a 1x or 2x? If 2x maybe a 1x would work – beyond that you do need some gap for it to slide though 1″ is a bit excessive. Some spacers are also adjustable & you might be able to shrink them up
As for the track at the bottom – you might be able to cut down the top trim & reinstall or if you don’t want to go that route add a spacer block at the bottom or go with a wall mount
Appreciate your suggestions, will try them. Thank you
My pleasure & if you don’t mind let us know how it goes
ok so what you did is almost exactly what we are wanting to do. removed a pocket door and replacing with barn door. this is for an entry into a second living area, but one we will spend the most time in. would you recommend a standard 32″ finished door opening or 36″. Thinking of appearance but also considering the bigger opening for furniture placement purposes.
First I got to say I am a big fan of 36″ openings & doors throughout the entire house, but… You have to consider what size door you can get. If you are going stock then you are looking at a 32-34″ opening to make sure a 36″ covers the whole opening (32 if you have trimmed opening – 34 if drywalled). Now if you are going custom or have access to a larger door then you can do what you wish & yes that makes life a lot easier later for couches, etc…