 In this series on Looking Back & Looking Forward, we are reviewing a green home we built over 2 years ago, the lessons learned and more importantly, how we can (or even how you can) utilize those lessons on future builds. In our last article, we got all the exterior framing completed & sheathed. In this article, we are going to cover what drying in means, the “Dry-In” portion for the roof only, and the Exterior finish products we used.
What is Dry In?
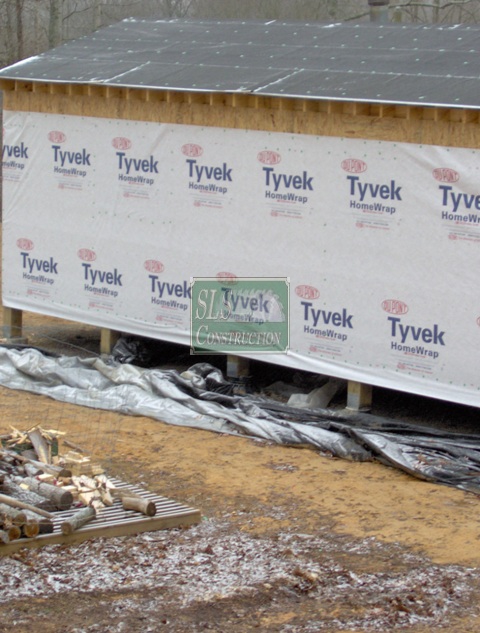
Drying In for better lack of a term is making a house impervious to the rain or short for Dry Inside. In short, drying in a structure means that the roof has been protected with at least a layer of felt, a product like Tyvek Housewrap has been installed, along with all the windows and doors. In Australia, they actually call this stage the “Lock Up”, while the interior trim work is called a “fix.”
Contrary to popular belief:
- This is actually one of the most important phases of construction.
- You do not have to have your siding installed before it is considered “dried in”
- You do not have to have your roofing installed before it is considered “dried in”
- Those cheap perforated plastic house-wrap’s are NOT as good as a real Housewrap
The Roof:
The roof is one of the most important elements on a house, one of the most abused (sunlight, rain, snow, debris & wind), and one of the most neglected items – well that is until you get a leak. While installing roofing is not rocket science, if it is done improperly, it will not last long at all. In fact, I was at a house not to long ago, that had only been completed 3 months before and it was already leaking because they did it wrong. The worst part, it was not a shingle roof but a metal one which makes the repairs that much tougher.
Three Layers of Protection:
On a standard roof, you have three primary layers that help protect your house: the sheathing, the underlayment, and then the visible roofing material of choice. In our case, we went with 5/8 OSB, Ice & Water Shield over the entire roof, followed up by Tamko 30 Dimensional shingles. If given the choice on a future building, I would be utilizing 5/8 T&G Advantech, Titanium PSU &UDL underlayment, probably followed up by a metal roof. At that time, getting the Titanium or Advantech products would have been a nightmare to get and steel prices were through the roof.
Sheathing:
The sheathing not only helps support the roofing materials, but any snow, ice, or branches that happen to be on it. In order for the roofing materials to work properly, the sheathing has to not only be able to with stand those loads, but also do so without deforming. If it starts bowing in, you have just created a nice gateway for the water to access the structure as the other materials will rip, tear &/or crack. That is one reason why we will not use anything less than 5/8 sheathing on our roofs.
The Underlayment:
Wow, since moving out here, I cannot believe how many times I see this product being installed incorrectly. Instead of running it horizontality, I see where they run it diagonally, vertically and even where they start at the top and work their way down (Yes they actually are lapping the lower layer over the next higher course). I guess they have forgotten two important factors – what the product is for & how water moves.
First, just a quick physics lesson – water generally runs downhill, so if you have something lapped improperly, and water has a means to travel under another layer – it will do so. Second, the underlayment is not made to protect the sheathing or act just as a “temporary barrier.” Its primary purpose is to be a permanent barrier designed to direct any water that makes it past the top layer off the roof. For metal, tile, & wood roofs, I cannot stress the importance of properly installing this layer strongly enough.
Nails or Staples:
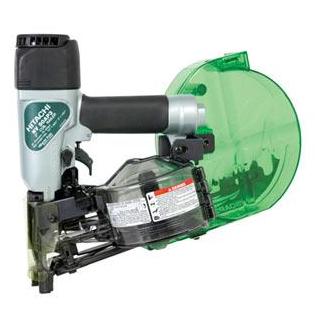
 Does anyone ever read the manufacturer’s directions, or at least glance at them? Staples (i.e. slap staplers) have been removed as a valid means of fastening the underlayment quite a few years ago. In our case, we utilize a Hitachi cap-nailer like the one pictured. There are four main reasons that one should use tabbed or cap nails; its code in many locations, most manufacturers require it, staples can actually cause water to leak through due to capillary action, and finally nails have a greater hold down power. now if you wish to still use staples, they make specialty cap-staplers which can be used in many cases or you must use a 1” minimum crown staple (except if going through foam).
Drip Edge:
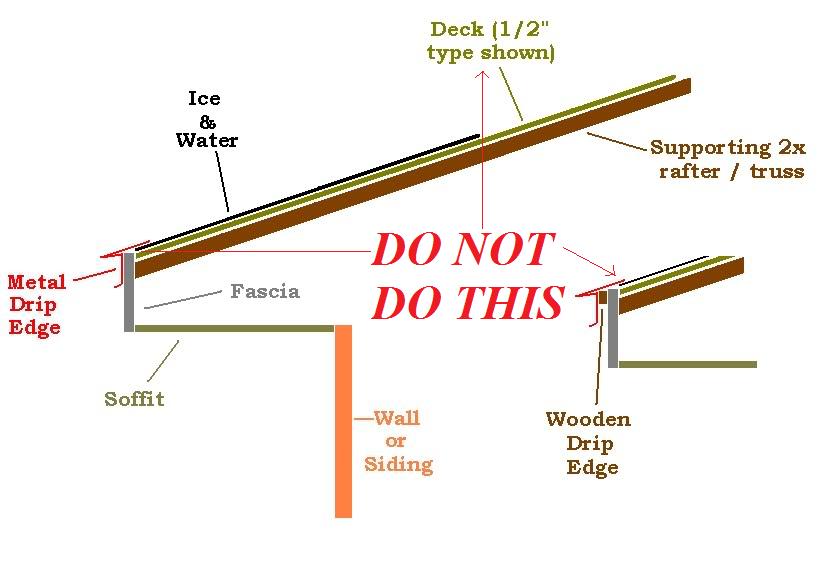
While some will claim that running the roofing materials just a fraction longer works just as well as a drip edge does; they are wrong due to issues caused by surface tension. There are two common ways of installing drip edge; one involves just attaching it over the fascia, while the other one backstops it with a 1×2 wooden drip-edge. Unless the wood drip edge would interfere with the gutter systems, we prefer to install both the wood & metal drip edges, which leads to another interesting item. Some underlayment manufacturers actually recommend that the metal drip edge be applied over their product that has led some installers to install it like the picture below.
If you will notice, they actually stop the Ice & Water at the very edge of the sheathing instead of leaving it long enough to cover the gap where the fascia and / or wooden drip edge is installed. Do we really need to show all the pictures of the fascia we have had to replace because others did this? In our case, because we did not have the fascia or wooden drip edge installed yet, we left the covering on the last 4 inches. This allowed us to properly adhere it later when everything was in place. If you also look carefully at the picture, you might notice that the fascia & wood drip edge are also below the sheathing adding another layer of protection.
Final Roofing Installation:
As I mentioned above we utilized dimensional shingles for our final covering. The shingles were actually installed late in the process for a few reasons. The first was the time of year, because yes that is dusting of snow on the roof. The second was to allow any settling or wood shrinkage to occur before the shingles went on. The last reason is to guarantee that we had no problems with any holes cut in the roof for plumbing vents, etc…
Related Articles:
- Looking Back series
- Snow is truly one of the best diagnostic indicators out there…
- The Hot-Roof Option
- There’s no such thing as a free lunch – Roofing Scams
- RIP: Solar Powered Attic Ventilator’s
- Working Safely – In the Heat
- Safety Sunday: 10 Safety Tips for Working in the Attic
- Air Sealing: The Attic Hatch
- Air Sealing: Attic Walkways & Storage

