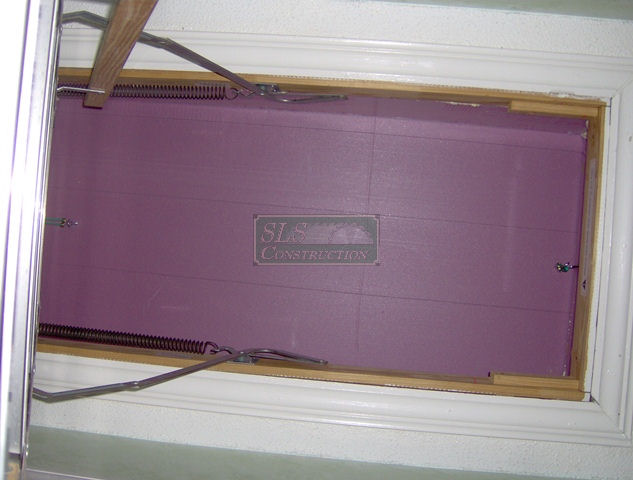
 In our ongoing series on Air Sealing, we are going to focus on the dreaded attic hatch, or as Allison Baile’s of Energy Vanguard so eloquently calls it, “A Mind-Blowing Hole in Your Building Envelope.” Instead of crunching the numbers as he did, one just needs to walk by one in a hallway during the middle of summer to know it isn’t insulated. For our friends up north, during the winter not only do they have a major cold spot, but they might have issues from ice-damming due to all the heat loss.
In this article, we are going to focus on one way that you can fix this issue to not only increase your comfort, but actually save you money almost all year long. This item will only run you around $60 in materials & only take about an hour to create using nothing more than a tape measure, a caulk gun, and a knife. We recommend doing this early in the morning before the temperature starts climbing into the stratosphere. For additional safety tips on working in your attic, we also recommend you look at our Safety Sunday Article on Attic Safety: Safety Sunday: 10 tips for working safely in the attic
What not to do:
There are a few ways to correct this issue & the most popular one done by many is applying weather-stripping & insulation to the access door itself (yes I have seen batts used, but the most common material is foam). I have one word for most of those & that is fail. Why, well the first big issue is if it is done properly, you wouldn’t be able to open it as it needs to be air-tight. My favorite ones are the ones with an attached ladder & they install the foam between the ladder & the hatch. Not only does this not work properly but you have just created an unsafe condition for anyone using the ladder.
ENERGY STAR:
As I recall almost all code versions prior to 2009 were mum on this subject, which led to some green programs creating their own requirements for access doors. The newest version of ENERGY STAR (V3) requires; “5.3.2 Attic access panels and drop-down stairs equipped with a durable R-10 or greater insulated cover that is gasketed (i.e., not caulked) to produce continuous air seal when occupant is not accessing the attic” Unfortunately they list some of the items I listed above in the “What not to do section” which will hopefully be removed. In this case, let’s look at how one can create a cover that meets these standards.
Materials needed:
- 2” thick foam-board (4×8 sheet) with an R-Value of 10 or greater
- 15’ foam weather stripping (the wider the better)
- 1 can Great Stuff® foam or similar
- 1 tube Liquid Nail® or other construction adhesive
- 8 – 16 penny nails
- Misc. hardware & 2 small bungee cords to seal it tight
Building the Box:
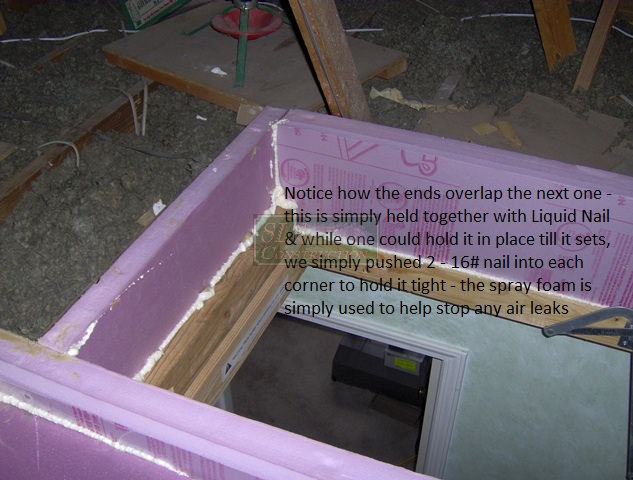
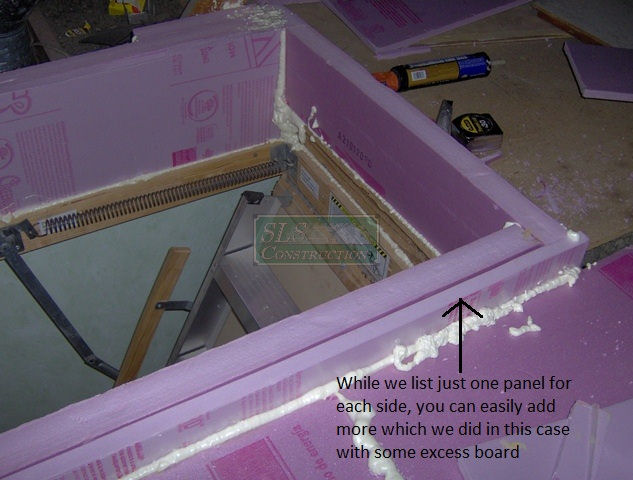
Using a straight edge, cut the side & end pieces – we recommend cutting those pieces from the edges so you have a guaranteed straight edge for the top where the lid will sit. If you have any obstruction in the way you can simply cut then out with a utility knife, a specialty insulation knife or even a handsaw. (Unless you live in an area where R49is required, ripping two 11” pieces lengthwise is sufficient – 15” is the minimum for R49) While you might think it has to be a perfect fit, a small gap around these obstructions is fine at the moment. Please remember that either the end pieces or side pieces must overlap the next piece.
Unfortunately, I don’t have any pictures of the Liquid Nail® being used but we simply applied the Liquid Nail® to the ends where the next piece butts up against it & where it sits next to the joists. In order to keep everything lined up, we simply inserted 2-16 penny nails in each end till the glue set in about 5 minutes. After the glue had set, we sprayed all the gaps & seams on both sides with Great Stuff® & moved onto the lid. While some prefer to use wood for the box, the results will not be as good as it still allows for thermal transfer to occor.
The Lid:
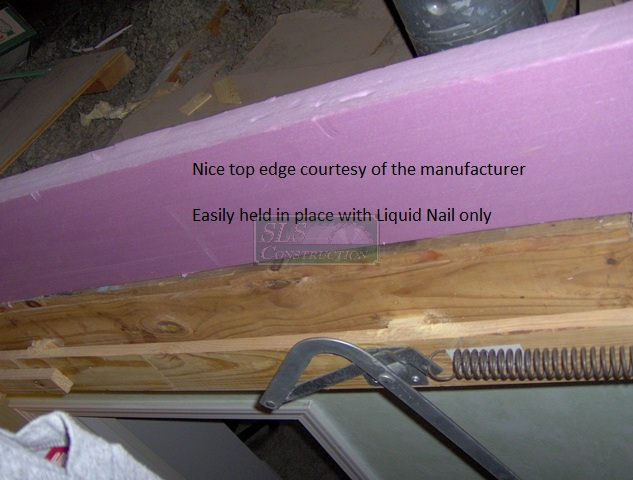
You should have enough foam left to create the lid from 1 piece of foam – if you don’t I recommend buying another sheet & using the leftovers for another project. In this case, we easily had enough & trimmed off the excess length. If at all possible, we would recommend leaving an inch overhang on all 4 sides. To ensure an airtight seal, the foam weather-stripping should be attached to the top of the box being careful not stretch it out.
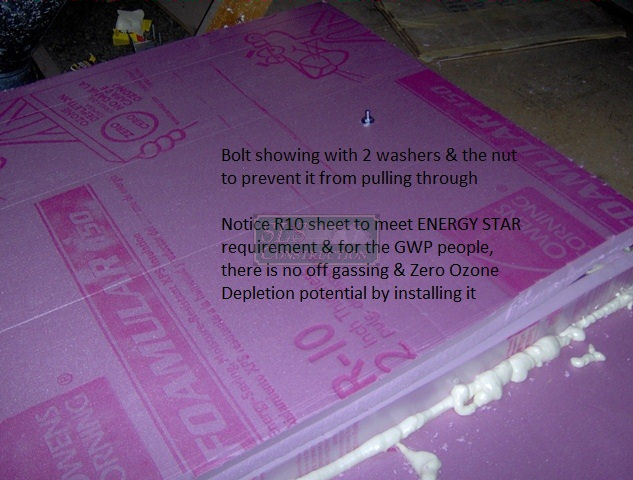
As you can see from this picture we attached a bolt with a hook at the end through the foam and used 2 washers & a nut to make sure that it would not pull through – we recommend one small washer & an oversized washer to help ensure that won’t happen.
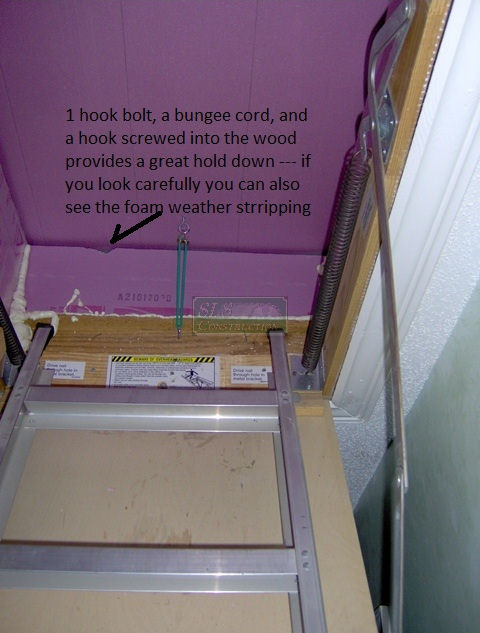
In this picture, you can see how we keep the lid in place – we simply installed 2 small hooks & the 2 bungee cords to help keep it in place. In order to access the attic, all they have to do is unhook the 2 cords & slide it forward in this case.
The verdict:
Using Allison’s example in the article I referenced earlier we have jumped from an overall R28 to an overall R35 (assuming my math is correct on this). With that said, the numbers don’t mean much if you walk by & can feel the heat which in this case the homeowners no longer do and love that simple change that was made.
The 2009 Codes:
2009 IRC N1102.2.3 & 2009 IECC 402.2.3: Access hatches and doors. Access doors from conditioned spaces to unconditioned spaces (e.g., attics and crawl spaces) shall be weather-stripped and insulated to a level equivalent to the insulation on the surrounding surfaces. Access shall be provided to all equipment which prevents damaging or compressing the insulation. A wood framed or equivalent baffle or retainer is required to be provided when loose fill insulation is installed, the purpose of which is to prevent the loose fill insulation from spilling into the living space when the attic access is opened and to provide a permanent means of maintaining the installed R-value of the loose fill insulation. (Italics ours)
Based on the wording of this, one might assume that the hatch above does not meet the codes as listed, but one must remember that there are two portions of the code. The first portion is referred to as the “prescriptive” section which you are required to meet everything unless you would pass utilizing the performance portion (based on overall U-Factor – this is discussed more in the Hot Roof Article). In the example listed above, we would easily meet the performance requirements of the code because the overall R value only has to meet an R30 in our climate zone. With that said, if you wish to meet the “prescriptive” portion, all you would have to do is add more foam to the lid or order a specialty hatch from a company like Battic Door. (No I have never used one before, but I have seen them at some of the shows & they are impressive – the cost isn’t outrageous either based on it’s construction)
In the next Air Sealing Article we are going to deal with the rest of code, which will include a unique way of storing materials in the attic and creating a workable walkway.

Or you can install a $99 Battic Door R-50 cover in 5 minutes!
Or you can install a $99 Battic Door R-50 cover in 5 minutes!
Hi Mark, first off thanks for showing us another option from your site, as I am not sure how I missed seeing it. With that said, while I did link to the one I would actually recommend, based on your site information – there is no way I would ever recommend that one you pictured.
In order for insulation to be effective it must be continuous and installed properly – your diagram shows a minimum of an 1.5 inch gap around the whole cover. You have the baffle on one side of the framing while this one is mounted to the attic stair assembly itself. No only does this cut down on the effectiveness, but leaves one of the most leakiest air spaces unsealed.
I know you can’t have it butting up against the baffles as you would have issues with the FG (?) insulation being compressed & the homeowner being able to properly seal it up.
Thanks for recommending this way to help insulate the house. My house absolutely freezes over when winter comes, and I often crank up the heater to no avail. I think I need to start checking for cracks in walls or holes where the cold air seeps in.
Thanks for thecomment & my pleasure. We have a ton of articles on that very subject (listed above) – seeing things are warming up now is the best time to start getting it done
Thanks for recommending this way to help insulate the house. My house absolutely freezes over when winter comes, and I often crank up the heater to no avail. I think I need to start checking for cracks in walls or holes where the cold air seeps in.
I have a question on the attic access box.The inside lip looks about 1 inch how did you get a 2 inch wide piece in there? Is the over all height of the piece from top to bottom 11 inches THANKS
The lid fits on top, not inside
Overall height depends on how much insulation you need to blow or place in there – as I recall this one was about 11″ (R38 cellulose) though you can certainly go higher as needed
I have almost completely installed a hatch as shown on my attic. This was the best option and most easily buildable by a person with no powertools. Its working great and keeping the cold air out now that I have it working. But it isn’t as simple as it looks.
First I couldn’t get a whole 8×4 piece of 2 inch foam home intact in a friend’s SUV, so I made the top out of 2 inch thick foam glued together. When I actually came to use it this proved too flexible so I glued another layer of foam crosswise.
Second, My long side pieces were also splice together so were made of 2 inch foam glued to 1 inch foam for a total of 3 inches thick with the cut edges offset.
Third; once I had the bottom part glued and nailed in place, I found the sides were slightly uneven due to inadvertantant vagarecies in cutting and/or uneveness in the wood surrounding the hatch. I tried to ignore this but the weatherstripping would not fill in the gaps. I had to run out to the hardware store and buy one of those rasp type planes. When I got it fairly level I made a sort of face frame out of 2 layers of 1 inch foam with lap joints for the top so I could have manufactured edge to manufactured edge on the top. I made sure this part was glued and dried so the corners would remain flat and square before I glued it to the side pieces. The bungee cord and the top made a great clamp to hold the entire thing flat. I then put foam on the open cracks between the new frame and the sides. This is almost air tight but I will put weatherstripping on this later
So far this has 2 inches of foam on the short sides, 3 inches of foam on the long sides, 3 inches on the top. It started out as 11 inches high on the side, but I glued 2 more inches on top for the face frame.
….
Congratulations & glad this helped – I upvoted this hoping some of your tips might help others. Getting the top level or at least in the same plane can be tricky especially as you found out – in general I don’t mind a gap down below as I would foam it. The only other trick for others (or you if you get another place) on transporting them is snap them in half (they have a seam down the middle) so then you have a 2×8 piece to transport or worst case rent a truck from your home center – assuming you are picking other stuff up
Thanks for the update & letting us know how it went
After I glued the weather stripping on, this was so tight that no light could pass through from the attic through the hatch.
My 2 inch thick foam sheet was cut into 4 foot long pieces to fit into a friend’s SUV. When I realized that this was not going to work, I had already rented a truck and brought 1 inch foam boards home whole without thinking that I might need an uncut 2 inch foam board. So the top was made out of a single piece of foam, but a 1 inch piece of foam. I originally glued more foam to have a 2 inch thickness, but as I said earlier this had too much flex so I glued more foam across it.
I had wanted to insulated the attic since I bought the house six years ago and I had wanted to install this hatch for a long time. I had read the article years ago and kept it in mind as something I wanted to make myself instead of buying the equivalent.
This took me much longer than an hour, but it was very worth it. If I were ever to do this again, or advise someone else, I’d tell them to measure twice, and then measure again before cutting. Bring the first piece to the attic to dry fit it.
I use the liquid nail that looks like Elmer’s glue and doesn’t have the strong warnings about using in a well ventilated spot. It however takes a long time to dry. When I was gluing the additional pieces to the top, I let it dry overnight.
Thanks for recommending this way to help insulate the house. My house absolutely freezes over when winter comes, and I often crank up the heater to no avail. I think I need to start checking for cracks in walls or holes where the cold air seeps in.
Thanks for thecomment & my pleasure. We have a ton of articles on that very subject (listed above) – seeing things are warming up now is the best time to start getting it done
Thanks for recommending this way to help insulate the house. My house absolutely freezes over when winter comes, and I often crank up the heater to no avail. I think I need to start checking for cracks in walls or holes where the cold air seeps in.