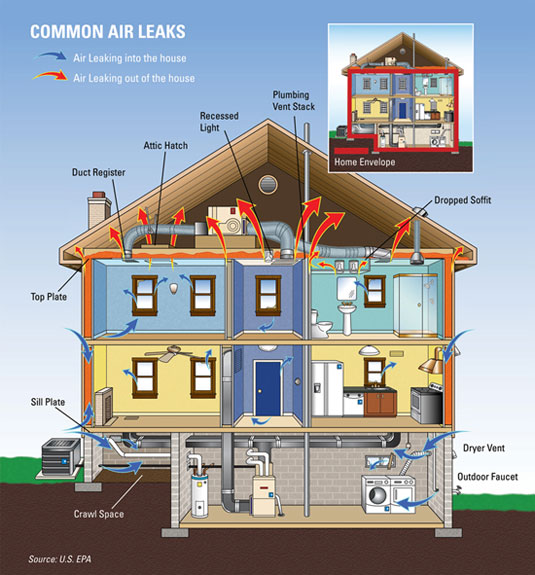
 In our ongoing series on Air Sealing, we are going to pop into the attic for the next few articles. Not only is this a great time of year to work in your attic, but with all the recent snowstorms, those fun little red arrows on the diagram start to make sense – all that heating I am paying for is going through the roof. While many houses around here have an unconditioned attic, many people are hearing and asking about the benefits of pulling the attic into the conditioned space, and whether this is only for new homes, or if it can also be done in older homes.
In that vein, we would like to look at one of the best options available for creating a conditioned attic using the hot-roof method. Unfortunately, the term hot-roof is a misnomer as the roof really is not that much hotter than a normal roof. Most studies show anywhere from 1° to 5° maximum increase in surface temperature during the sunniest part of the day, while at night the surface temperature drops faster than a regularly vented roof. A hot-roof is one where there is no ventilation required as the insulation is directly attached to the roof sheathing. While some try to do this with Fiberglass or Cellulose, their efforts are for naught and quite simply, it is not allowed by any legitimate building code out there.
The Benefits of a Conditioned Attic:
- Unconditioned attics require more insulation as the temperature in the attics can easily top 140° in most areas of the country during the summer.
- In many locations electrical, water, & air-ducts run through those areas that make finding electrical junction boxes hard, and water lines can freeze or will spring a leak due to expansion & contraction issues due to temperature changes.
- By putting the ducts inside the conditioned space, not only do you not have the issue where the air in there is superhot or cold, but also any duct leakage is not being lost outside, but kept inside the house.
- Assuming the roof trusses or framing was designed to handle it; you can now store items in your attic without trading off needed insulation. (Granted a few companies install raise healed trusses – making this point mute, but I have yet to see them installed in this area, or many others)
- For our neighbors up north, a properly conditioned & sealed attic will eliminate ice-dams.
Two Main Options:
While there are many variations, there are two popular options used to create a hot roof. The first method revolves around foam sprayed in place (generally sprayed in between the rafters / trusses), while the second utilizes foam board (generally placed on top of the exterior roof sheathing.) Depending on your roof, ease of access, etc… this will help dictate which method would be best for your home and is generally best left to a professional (not including cheaper in the case of sprayed foam).
Spray-foam the interior:
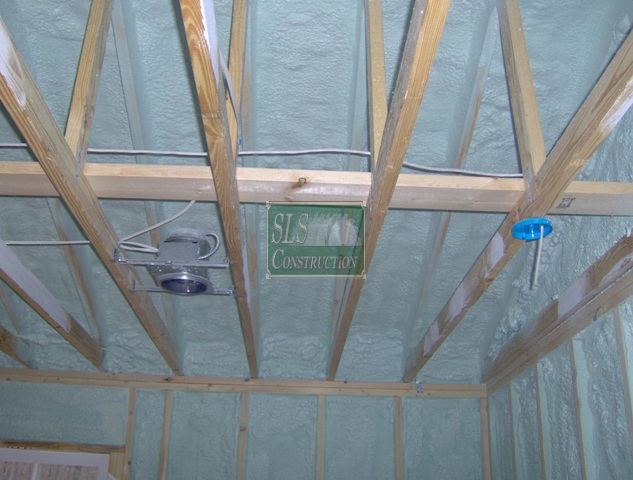
 Far & away, this is the most popular option available, in not only new construction but in retrofitting work where the attic is not finished. In cases where there the roof is, what we refer to as all cut up (multiple dormers, pitch changes, turrets, etc…) this is about the only real choice one has to get all the details right, and completed in a decent amount of time.
For retrofitting work, there are a few items to watch out for and that involves not only your existing roof, but also the sheathing. If your existing roof leaks, has spongy areas, the sheathing shows signs of mold, rot or water damage, etc… you need to have all those issues addressed first. The existing venting will also have to be eliminated and sealed up, as it is no longer needed. The final item, goes for all foams & that is you should probably plan on being in a hotel for a night or two as the fumes / VOC’s will need a chance to be exhausted from the house. (For more on this house – check out our Looking Back Series)
Foam boards on the exterior:
 While this option is not as popular, it does offer some benefits that one should not overlook. The biggest that applies to both new & older homes is the elimination of thermal transfer. In the case of spray foam, unless the rafters or trusses are fully coated with foam, heat will transfer through the wood, to the sheathing & finally outside. While that may not be a big concern for us in the south, up north that can lead to some issues with ice dams, and increased heating loads. Another benefit for those with timber frame homes, finished attics, cathedral ceilings, or you are worried about losing any headroom is all the work is done outside.
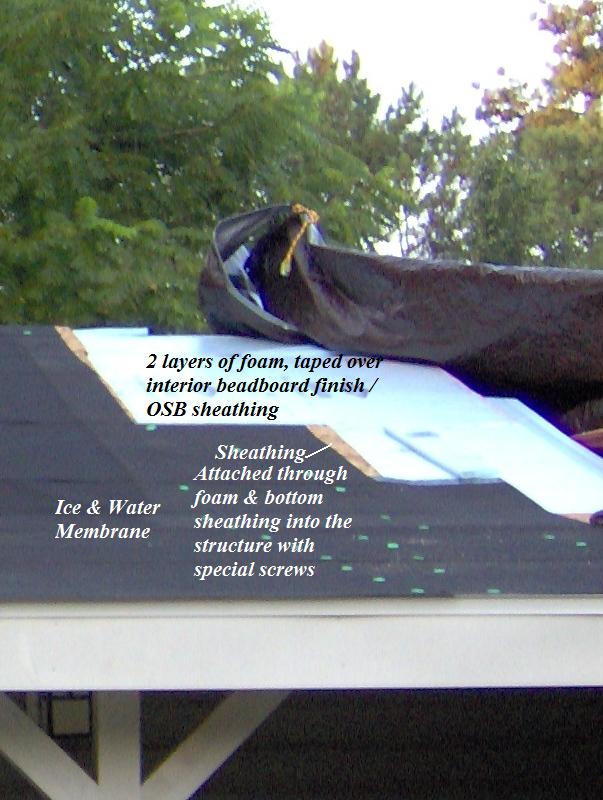
 Where spraying the inside with foam might require you to redo the roof, this one makes it mandatory, as the existing roof has to be removed. Once any sheathing or structural issues have been corrected, you now can install the foam boards. As a best practice, you should install at two layers of foam boards instead of just one and overlap all the joints to help prevent any air leakage. You then follow it up with another layer of sheathing and the roofing. Now there is one major downside to this system, and that is how much foam you can add as almost everyone agrees that 6” is about the maximum. (For more on this house – Renovations & Insurance)
Details still matter:
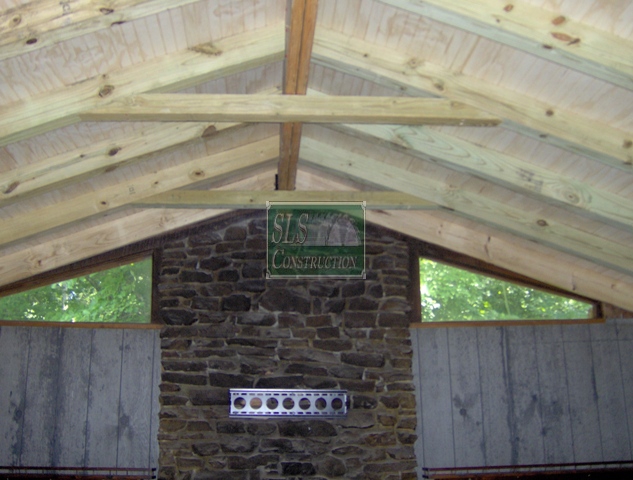
For many of you that read / looked at all the pictures in the “Snow is truly one of the best diagnostic indicators out there…” article, one can easily see what happens when the warm air from inside gets into the attic. Since this method brings the attic into the conditioned space, you no longer have the venting to help dissipate any little leaks in the buildings thermal envelope. This leads us to these great pictures from Jeffery Sauls of D2D Sustainability of Atlanta Georgia who specializes in ratings for EEMs & ENERGY STAR certifications. For more great information on this subject and these photos, you might want to check out this post by Allison Bailes of Energy Vanguard.
Other Frequently Asked Questions:
How about SIPS, or?
Most of the other systems on the market are derived from one of those two methods above. In the case of a SIPS panel, the steps listed above in the foam board section apply. The nice item about them is the 6” limit does not apply as some panels are up to 12” in depth giving you a greater R-Value and are screwed into timbers. With that said, depending on the SIPS panel you buy, you could actually have either a piece of foam board glued between two pieces of OSB, or a panel created where they inject spray foam between two sheets of OSB (awesome to see that process & the rolling presses they use to keep it from expanding beyond it’s specifications).
To find out what the best solution is for your home, it is best to bring in an individual that understands all the different components, how things work, and will give you straight answers and not just try to sell you on a fad, or their product.
Closed Cell or Open Cell foam:
Unless you live in climate zones 2B or 3B (Desert area’s in Texas, New Mexico, Arizona & California) the codes and common sense will point you to Closed Cell Foam. If you wish to believe a certain manufacturers claims (just one of many bogus ones) and install an Open Cell product, make sure it has a vapor barrier sprayed to the foam. The same applies to foam boards especially when you consider the limits on how much you can apply. Closed Cell & XPS has almost twice the R-Value as others, if not more in some cases. As a warning note – all foam products lose some R-value over time, so before you buy into the manufactures installed R-Value number, you might want to cut about .5 off that number if they state it is above an R7. Open Cell does hold up a little better, but as of now, anything above a 3.7 is pure marketing.
UPDATE: Well as they say that one thing that is always a constant is change, the newer codes do allow one to use open cell. Unfortunately as many are finding out, just because something is allowed, doesn’t mean that one should
Do I still need to airseal around all those penetrations in the attic floor?
While one has moved the attic into the conditioned area, you still need to caulk or foam those penetrations. The primary reason is not to prevent air leakage, but to help in case their is a fire and preventing it’s spread. For those utilizing open cell, this becomes even more important to help prevent the product from essentially sucking in that moisture.
Do I need as much insulation?
Are you ready for this – yes, no & it depends. Unfortunately, this article is a little longer than I was anticipating so we will delve more into this topic later. In short, depending on your climate zone, and local codes, you should have R30, R38 or R49 in your attic. The 2009 IECC allows for two small exceptions – the U-factor alternative (402.1.3 & .4 – that require an overall R value of 28.6, 33.3, and 38.5 depending on your climate zone) & another one for area’s further up north, the “step-down” option (402.2) when the insulation extends past the top plate (if R38 is required only need R30 / R49 only needs R38).


Great article, Sean!
If I may, I’d like to make a suggestion. To avoid confusion, I recommend we use the term indirectly conditioned attic or encapsulated attic . Technically speaking, we’re not bringing the attic inside conditioned space, we’re bringing it inside the thermal envelope.
The IRC section that deals with this (806.4) has the unfortunate title “Conditioned Attic Assemblies”. I know of building inspectors and plenty of mechanical contractors who mistakenly assume this means there must be supply vents in the attic. Neither the IRC nor the IMC requires direct conditioning. There’s simply is no rationale for doing so, unless the homeowner likes to waste energy.
Thanks David for the comment. While I do agree that we do have an education problem with certain inspectors & contractors, I don’t think changing the name would help & it might just add to the confusion. By bringing an area inside the thermal boundary, we are bringing it into the conditioned space. Now just because it might be in that area, it does not mean we must condition it, just like we don’t condition most closets or other spaces where one does not live, cook, or sleep.
Some good points made here Sean. Several I have not heard before now. I still believe it would increase the heat /cooling load… I do like the ability to access wiring and other systems run in the attic. I gonna ruminate on this a bit more.
Thanks!
My pleasure Kent & thanks for keeping an open mind and checking this article out. If you have other questions, please feel free to post them here, on the Best Practices Residential area on the Home Pros Site (http://homeenergypros.lbl.gov/group/bestpracticesresidential), or even shoot me an email.
Very nice post. I love these kind of posts that force me to read the whole blog. So nicely presented.
Thanks for sharing this great article. Good job and keep posting.
install metal roofing over shingles
Sorry but is there a question here? With that said I would only consider it using a track system over a roof in really good condition. If there is 2 layers of shingles, leaking issues, etc… no – tear it off & do it right or it could bite you even worse later
Great article, Sean!
If I may, I’d like to make a suggestion. To avoid confusion, I recommend we use the term indirectly conditioned attic or encapsulated attic . Technically speaking, we’re not bringing the attic inside conditioned space, we’re bringing it inside the thermal envelope.
The IRC section that deals with this (806.4) has the unfortunate title “Conditioned Attic Assemblies”. I know of building inspectors and plenty of mechanical contractors who mistakenly assume this means there must be supply vents in the attic. Neither the IRC nor the IMC requires direct conditioning. There’s simply is no rationale for doing so, unless the homeowner likes to waste energy.
Thanks David for the comment. While I do agree that we do have an education problem with certain inspectors & contractors, I don’t think changing the name would help & it might just add to the confusion. By bringing an area inside the thermal boundary, we are bringing it into the conditioned space. Now just because it might be in that area, it does not mean we must condition it, just like we don’t condition most closets or other spaces where one does not live, cook, or sleep.
Very nice post. I love these kind of posts that force me to read the whole blog. So nicely presented.
Some good points made here Sean. Several I have not heard before now. I still believe it would increase the heat /cooling load… I do like the ability to access wiring and other systems run in the attic. I gonna ruminate on this a bit more.
Thanks!
My pleasure Kent & thanks for keeping an open mind and checking this article out. If you have other questions, please feel free to post them here, on the Best Practices Residential area on the Home Pros Site (http://homeenergypros.lbl.gov/group/bestpracticesresidential), or even shoot me an email.
Thanks for sharing this great article. Good job and keep posting.
Hello. I’m in Mpls MN. We have a 1 1/2 story 1929 stucco home, w/ soffits that are also stuccoed. We installed a hot roof 7 yrs ago. The upstairs hall has a ceiling, & above that is a cathedral attic that we foamed, And there’s knee walls. that are sheet rocked, so we foamed behind those knee walls. We notice we still have some ice dams, & patches on roof where the snow melts off. When we did the knee walls, we tore off the sheet rock that was covering the rafters, & built out the rafters w/ 2″ foam board, then foamed & re-sheet rocked. But we may have missed something in that part of the assembly-maybe missed something important, but what? We also missed something behind the knee wall area-where the rafter meets the floor; we foamed the rafters, covering all & foamed onto the floor. We should have maybe have lifted the floor boards at the eave area (where the rafters meet the floor boards), & in each area (so each space between joists) should’ve been filled with foam, is that right? Because those areas are allowing warm air from the side walls of the house to heat that area. Does that matter? Maybe not, because the foam stops that warm air at some point there? And what to do at this point, if this is the problem (or one of the problems)? Should we go around the exterior, when we re-roof (shingles) & drill holes either in the stucco & shoot foam into those soffit voids? Or drill holes in the roof boards every 16″ on center & shoot foam into the soffit voids there? How would we know how much foam to fill each area with? You can’t see what you’re doing so you don’t know how much foam is going into each hole. *Our heat bills are much improved now, since the foam install, so maybe we should just call it a day? Because this soffit-void fix would be expensive. We are hiring a roofer. We are concerned also with the tear-off-if there’s any rotten boards, to put new foam down before re-sheathing. That has to be done right & we’re not sure how to write that into the contract. (So far we’ve written “at tear off, photos of roof for owner to inspect) We also need to know if we should put water & ice shield over the whole roof?
I am slightly confused – did you spray all the sheathing from eave to ridge, or did you stop at the knee walls & jog down?
First, I wouldn’t drill in from the outside – you will not get proper coverage – you will need to attack that from the inside, You may have to pop the soffits off & install blocking like foam board for them to spray the foam against. I would not attack this at all until after the roof is done as the melting spots on your roof could require a replacement sheet due to improper install or… The spots could be due to insufficient depth & while that sucks it might not be causing an issue with the sheathing.
As for sheathing – I would be on site & walk it with them, pictures rarely tell you if something feels off, etc… IWS – I would refer you to my most recent piece & no it doesn’t hurt to do the whole roof, but with a properly done hot roof the code minimum should be fine though I would go over the rest of the roof with synthetic. (Note this is assuming shingles – if metal than I would probably due the whole roof) If you are worried about wind tear off then a trick they do in Florida also has merit where all the seams are taped before they install felt / synthetic.
As for is it worth the money – hard to answer. It might not be as you will still have some ice build up, even with a hot roof system, especially if you do have a lot of snow on the roof. For areas with 50lb loads we recommend a ventilated hot roof – where you have sleepers over the hot roof followed by sheathing, roofing etc… Eventually I will get to that article
I hope this helps & feel free to reply with further questions
Hi, thanks. Yes the foam is from ridge to eaves. Shingle roof. So about the soffit void area:-tear out the foam where it touches down onto the floorboards in the knee wall area, right? And lift up those floorboards=they’d have to be cut, then fill in with foam or w/ blocks then foam around the foam blocks, in each area between the joists, right? then replace those cut floorboards? (Whew. How important to tear out that soffit area for this re-roofing job? Should I send you photos of that soffit area on interior, or the patchy-snow on the roof? it’s not that bad, just some areas.) It’d help to talk with you on phone or do this by email, since I’m having trouble logging in. My #612-522-9342 landline. I’m 76, can’t ‘walk it w/ them’ to inspect tear off, so need photos to tell me whether at tear off if they’ve disturbed the foam. We have no sheathing, just old boards (1929 house) & the boards are but up against each other pretty good-maybe 1/2″ at the most. I also want to replace the original step flashing-done the old way. That is a real custom job & most don’t know how to do it right. Thatt’s a whole study in itself. Finding the right contractor too. Well, I appreciate any info you may direct me with. ty. maureen
First, you can feel free to call me on Friday (I deleted yours off the comment) – number is easy to get (just click the SLS Construction & Building Solutions pic above) and the number is at the bottom of the page…
With that & for others maybe reading… If they did it as you said (& properly down to top plate) you should be good – no insulation is technically needed in the kneewall area. Now as for the rim joist area – hopefully that was sprayed also OR it will need to be insulated.
There are numerous ways of doing that now – foam, cellulose, batts, etc… one of the cheapest & easiest ways many do it after the fact is drill a hole (with a whole saw) in each bay & slide in an onion bag (big mesh bag that will fill the bay)- & spray cellulose in it to it is full. now you can slide the plug back in & caulk around it.
As for redoing the roof – yes you should replace all the flashing though you did mention stucco – hopefully they already have counterflashing there already or you are looking at some stucco repairs. You may wish to review: https://thehtrc.com/2013/getting-details-right-roof-flashing