For most builders & crews the biggest question when it comes to sheathing a wall is “should we do it while the wall is being framed on the ground, or after we have stood it up?” For others that have to add foam on the exterior, some start to wonder, “if I need to add this insulated foam board, do I really need to use wood sheathing everywhere or can the foam replace some of it?” With all the changing codes many are starting to also wonder, is what we did in the past still the best method, or are there easier & better means to do it now?
 Unlike OVE where the premise is primarily on reducing the amount of studs or wood used in a wall, the basic premise behind Optimized Framing Techniques is taking the best framing techniques that fit the house you are building & utilizing them to not only save resources but to also have a strong, durable structure that uses a minimal amount of connectors required by other techniques. Unlike OVE where the premise is primarily on reducing the amount of studs or wood used in a wall, the basic premise behind Optimized Framing Techniques is taking the best framing techniques that fit the house you are building & utilizing them to not only save resources but to also have a strong, durable structure that uses a minimal amount of connectors required by other techniques. |
The What & the Why?
If I had to sum up sheathing I would refer to it as; A material used to enclose & protect the structure (along with its contents) which also helps provides the needed structural stiffness & backing required by that assembly. For most residential structures the most typical materials used now are OSB or plywood while in some commercial wall assemblies a specialized gypsum type product is used.
 While one would assume the most damage from the winds comes from the wind hitting the building, most damage sustained comes from the wind hitting the building at an angle where it can get behind the siding and essentially peel it off.The next biggest area of damage actually is on the backside of the building where the suction forces created can easily rip off most sidings & even foam board. (For example the assembly needs to be able to resist anywhere from a-29 PSF force at the corners, while the center area should be able to resist a -24 PSF.The bulk of damage from wind hitting a building straight on is actually caused by debris penetrating the structure which is why many coastal communities require “hurricane” glass or some other form of protection. This is also one reason why you may wish to consider bumping your sheathing up past code minimums & going with a thicker panel. At minimum I prefer a ½ sheet for 16” OC framing, while others I know will go no less than 5/8 or ¾. ¾ plywood is a favorite for some as it has been tested to stop a 2×4 being shot at it @ 120 mph. While one would assume the most damage from the winds comes from the wind hitting the building, most damage sustained comes from the wind hitting the building at an angle where it can get behind the siding and essentially peel it off.The next biggest area of damage actually is on the backside of the building where the suction forces created can easily rip off most sidings & even foam board. (For example the assembly needs to be able to resist anywhere from a-29 PSF force at the corners, while the center area should be able to resist a -24 PSF.The bulk of damage from wind hitting a building straight on is actually caused by debris penetrating the structure which is why many coastal communities require “hurricane” glass or some other form of protection. This is also one reason why you may wish to consider bumping your sheathing up past code minimums & going with a thicker panel. At minimum I prefer a ½ sheet for 16” OC framing, while others I know will go no less than 5/8 or ¾. ¾ plywood is a favorite for some as it has been tested to stop a 2×4 being shot at it @ 120 mph. |
Horizontal or Vertical?
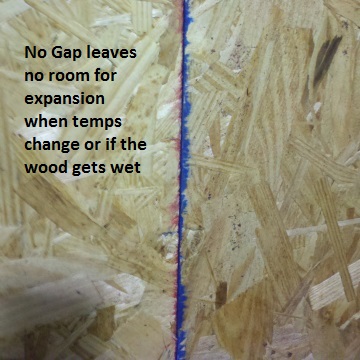 For years, many of us simply installed sheathing horizontally & used a 16 penny nail slid between the sheets to help ensure there was room for expansion & to help reduce the swelling caused by an moisture that got between the two sheets. With changes to the codes (caused mainly by a better understanding of seismic shear forces & what was required to help prevent a wall from racking in the wind…) it became a requirement in certain areas to start sheathing the corners & a few select other areas vertically.
As you can imagine this started leading many to start asking, if sheathing these areas vertically is good, how about the rest of the house, should we go back to horizontal in those areas or simply stick with doing it vertically? Well with the exception of maybe a few large windows, going with 100% vertical easily wins out especially when you consider a few more of the unexpected benefits. The dreaded wavy panel seam ceases to be an issue & low & behold the amount of air leakage took a major nose dive. Why, well you remember that 1/8” expansion gap that is required for expansion & contraction – well it now falls on a joist eliminating that path.
The death of the 8’ sheet… One of the biggest items when sheathing a wall vertically is that the sheathing has to be continuous (602.10.4 &.5) which meant that an 8’ sheet wouldn’t cut it in many places so longer ones were required. So companies like Norbord started creating “TallWall” & “WindStorm” panels to help alleviate this. One of the biggest advantages to this was not only does one end up with a stronger wall, but it also did not require as many fasteners & anchors saving time & money.While many of us do like using Simpson Strong Tie products, when a wood wall has more steel connectors than wood studs, one has got to wonder…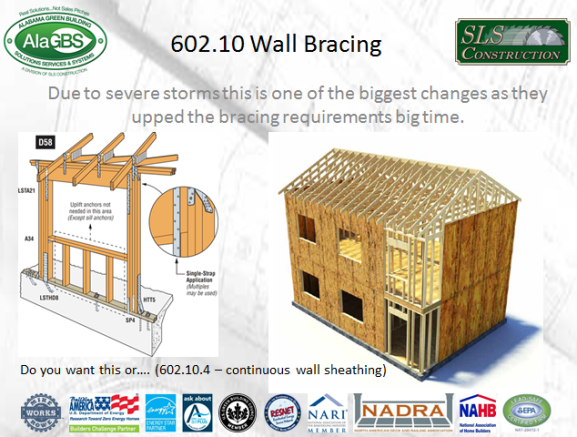 |
Installing sheathing vertically:
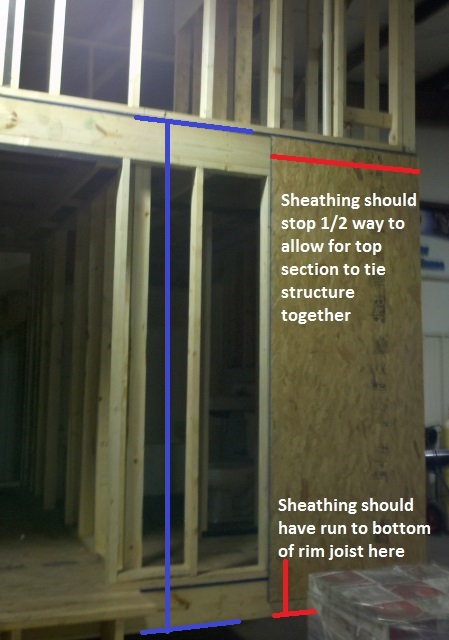 This is a picture I took when doing a presentation at the Local 372 Training Center in Tuscaloosa which primarily offers programs related to welding & plumbing. They created this 2 story mockup to help assist in their training & it just so happens to makes a great example. For a one story house, the sheathing should extend from the bottom of the lowest framing member to the top of the highest framing member (as shown in blue).
For multi-story buildings the sheathing on the bottom should extend down to the bottom of the lowest framing member & extend to the halfway point on rim-joist (as shown in red). The next piece above it should be allowed a 1/8” expansion joint ending at the top plate or at the midway point of the next rim joist. For more on these connections & other best practices you may wish to check out the APAwood.org site.
| While some may like the idea of going vertical it just might not be in the works for them, but no worries there are ways of installing it where you can still gain some of the benefits. Zip Wall is an interesting system which combines the sheathing with an integrated WRB & air barrier all in one. Another great option is 5/8 Tongue & Groove sheathing (just make sure the tongue is facing up) so if any water does get in, it can run back out & not into the groove. |
Stepping it up a notch:
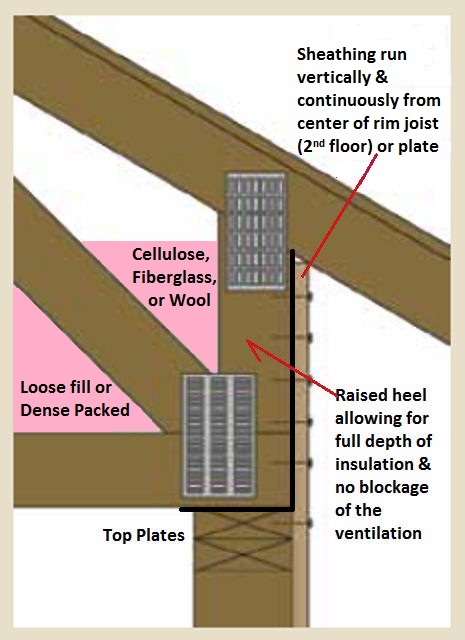
While raised heel trusses are still considered the domain of “green building” at this moment, with the stated goal of the ICC, AIA, & the others striving to reach net-zero by 2030, you can expect that they will soon become mandatory. Not only are they great from a thermal efficiency standpoint, one can extend the sheathing up eliminating some bracing (allowing for more insulation), the need for baffles, but also help create a more sturdy structure.
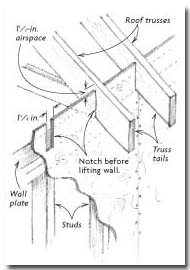 Mike Guertin is one of the original pioneers of utilizing the wall sheathing with trusses. His original work back as this diagram from a 2005 Fine Homebuilding magazine reprint shows, it was mainly used for blocking the insulation & eliminating the hassle of installing baffles. I got to admit, combining his notching idea with a raised heel or hot roof system would make for a pretty tight system. Mike Guertin is one of the original pioneers of utilizing the wall sheathing with trusses. His original work back as this diagram from a 2005 Fine Homebuilding magazine reprint shows, it was mainly used for blocking the insulation & eliminating the hassle of installing baffles. I got to admit, combining his notching idea with a raised heel or hot roof system would make for a pretty tight system. |
Sheathing Grade Marks:
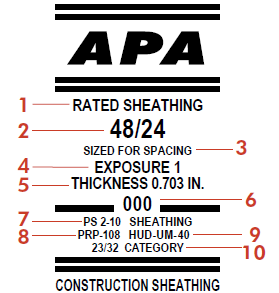 One of the most confusing aspects for many people is understanding what the grade marks mean on lumber.
- This is commonly called the “panel grade” which can refer the grade of the veneer or its intended use.
- Span Rating — in some cases you will see two numbers separated by a slash while in other cases you may just see one. The left-hand number is maximum spacing for when used for roof sheathing with long dimensions across supports while the right is for flooring.
- Occasionally you may see one of two terms here:
- Sized for Spacing refers to a panel that is trimmed a fraction shorter so that when installed with the proper expansion gap it will equal its nominal size.
- Tongue and groove
- Bond Classification refers to the exposure rating based on the severity and duration of the weather and moisture exposure the panels are designed to withstand.
- Manufacturing mill’s thickness declaration
- Manufacturing mill’s identification number
- Product meets Voluntary Product Standard (typically PS 1-09 for Construction and Industrial Plywood & PS 2-10 for Wood-Based Structural Use Panels)
- Product meets APA’s Performance Rated Panel Standard
- Product meets HUD Standards
- The performance category is linked to the nominal panel thickness designations used in the IRC & IBC
| One of the most popular questions asked by new framers is should I stand the wall up & sheathe it or should I sheathe it while it is on the ground. By far & large I like doing it on the ground as it is much easier to get everything lined up, glued & nailed properly before raising it up. Shoot some builders are known to actually install the windows siding & trim & then raise it up because it is so much easier that way.With that said; the wind, manpower & equipment available is generally the main deciding force. If you only have two or three guys, you can easily & safely stand up a long wall with framing member only. Adding on the sheathing and you will either need a lot more men or pump jacks. For tall gable walls that are fully fitted out, you had better have a boom truck or some sort of lift to help make it happen. |

If the sheathing is a full 4′, won’t the 1/8″ gaps eventually add up and move the sheathing off center on the studs?
Good question & yes it can just like it will if you do it the other way at 8′ (just a little faster) – with that I rarely see issues based on how / the nature of framing is done though occasionally a sheet might be ripped a little bit to get back on track. One can also start at the center of the wall section & work out to the edges
‘Im building a Cabin and i’m thinking about making 10 foot walls. They only have 4′ x 8′ sheathing where I am at. how would you recommend I sheath the outside of my cabin?
I was thinking of staggering 8′ and 2′ all the way across. For example, I would secure the first 4′ x 8′ sheet on the bottom, and do a 2′ x 4′ sheet above that. Then my next row secure the 2′ x 4′ sheet on the bottom and then the 4′ x 8’ sheet on the top.. and keep going in that pattern. Does that sound like a good idea?
You can get larger sheets at your lumber yard – you will just have to buy a “bunk” generally. With that I would go horizontally if that isn’t a viable option – having 2 seams is better than dealing with 2×4 panels especially if you have seismic or wind concerns
I’m in the process of figuring out how to upgrade our siding. We live in N. GA and deal with a lot of rain. Our basement/garage features a step-down, with the foundation walls (basement is underground and garage has a half-framed weightbearing wall). Our current sheathing is 1/4 foam but I’m wondering if I should change to plywood or one of the newer water-resistant options for the half-frame and the first floor? What would be the better option for the areas that meet the foundation?
Sometimes the best way to answer a question is with another question. Why do you think you should or want to replace the sheathing? Do you have any ongoing issues? I am doubting that you have 1/4 foam as sheathing, rather that is probably the foam many siders like to use to hide imperfections in the surface & it is covering plywood / osb sheathing. If it is foam it should be at least 1/2 thick to match the sheathing on the walls.
With that said I prefer plywood sheathing but have no issues with OSB especially products like ZIP, AdvanTech, WindStorm, etc… especially the larger sheets. The biggest thing is to make sure all the details are done right especially related to the water control layer so you don’t end up with rot issues. If energy usage is a big driver I would look at adding insulation on the exterior if the sheathing (not that 1/4 junk) but rather 1″ or better foam. Zip also has an integrated foam / sheathing panel but I have yet to use it. If water is an issue (and even if not) I would use a drainage wrap or consider going with a full rain screen option.
The biggest issue I see at this time though is the price & you might wish to hold off a few months till lumber prices drop back down – I know in some areas prices are up almost if not more than 300%. The other catch is if you redo your sheathing you will have to reset your windows. I hope this helps & if not please clarify with more details &/or consider a virtual consult. https://sls-construction.com/existing-home-audit/virtual-remote-assessments
Thank you for responding. 🙂
To answer your questions – we’ve been dealing with flying squirrel damage, a wasp infestation, and carpenter bees. As a result, in some areas the foam sheathing is damaged beyond repairing with tape. On the lower levels (basement/garage and 1st floor) we’ve had issues with water coming in due to poor landscaping – which was just fixed. On top of that, the siding is now coming due to be dealt with, and it’s cedar that was poorly taken care of and is rotting or damaged by bees/squirrels in many places, so goal is to replace with hardiboard.
As to the foam sheathing, I wish I could tell you I was wrong. But we have re-routed venting through the siding in several places as well as being in the process of gutting/renovating an upstairs room (the garage section I referred to in my initial question is also unfinished on the interior) and it’s nothing but frame, foam, then siding; and the foam is 1/4″. Given the other unseen issues with this house it was a head against the wall moment when I saw it, as I thought there was plywood or OSB between the foam and the siding.
As we get closer to spring (mild winter is predicted which means a lot of rain), I’ll schedule a virtual consult. The intention is to go section by section, as some windows are going to change into doors and other windows are going to be replaced. So that will solve the resetting issue. And the section I’m most concerned about does not have any windows on it and is bordered by our deck at the top.
This was very helpful, thank you. Been trying to learn as much as I can just in case I need to hire a contractor.
I’m on the west cost where for years shear was taken care of with a 1×4 run diagonally in the interior side of the framing. Then the exterior was finished up with tie wire wrapped around the house horizontally at about 12oc and then tar paper then stucco.
My question to you. We are doing a remodel of 1/3 of the house. This is a ranch style house with the garage at one end. Where the garage use to be we are rebuilding the foundation with a stem wall to match the rest of the house (providing a crawl space and ventilation) and then reframing all the walls (interior and exterior) at that end of the house. I’m inclined to sheet that end of the house with 7/16 osb to take care of my shear and to create a more air tight envelope, but that creates both a problem and a question.
The problem is that where the new framing meats up with the old on a long straight wall there will be a 7/16″ difference. The question then is do I offset the new framing that 7/16″ so the walls meat up at the same plane or is there a good enough argument to just sheet the rest of the house? All the stucco is coming down and being replaced so that isn’t a factor. It is just the cost and advantage or not of sheeting the rest of the house.
Your opinion would be great,
Thanks
If all the stucco is coming off – I would resheathe it all just from a tightness standpoint. You may also have to as seismic codes have gotten tighter & this can help with that. This also gives you much more flexibility on material changes if you like &/or adding in a rain screed detail or drainage wrap. Another issue (depending on is this seismic not just bracing) is locking the two separate walls / structures together to act as one unit.
I do have to ask, why a ventilated crawl space? An encapsulated crawl is generally a much better option & gives you a storage option. Best of luck