No matter what the age of a building there is one simple universal truth; water is a buildings worst enemy. As the saying goes, if you can keep the water out & away from the building, it can last forever. One of the most overlooked areas unfortunately happens to be your homes primary defense; the roof. Not only does it get short shrifted by many designers & architects, but then we have some roofers that top this off by trying to save a few bucks. Then to add the proverbial cherry on top, we have homeowners that barely look up, much less take care of any needed maintenance.
 If you wish to know the code minimums for each type of roofing, they can be found in the 2009 IRC under section R905. They generally fall under .X.8 or the “Flashings” heading for each type. I must quickly point out that felt aka tar paper is not an option listed & you should refer to and install in “accordance with manufacturer’s installation instructions” If you wish to know the code minimums for each type of roofing, they can be found in the 2009 IRC under section R905. They generally fall under .X.8 or the “Flashings” heading for each type. I must quickly point out that felt aka tar paper is not an option listed & you should refer to and install in “accordance with manufacturer’s installation instructions” |
Valley Flashing:
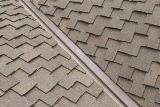 I don’t know if it is just this area, or what but I see so many issues revolve around the valleys. Maybe it is because they like doing the “woven” style out here while out west we trimmed the shingles back & used a “W” Flashing detail. No matter which style you prefer, you should use a full 3’ wide layer of Ice & Water Membrane (I&W) in the valley.
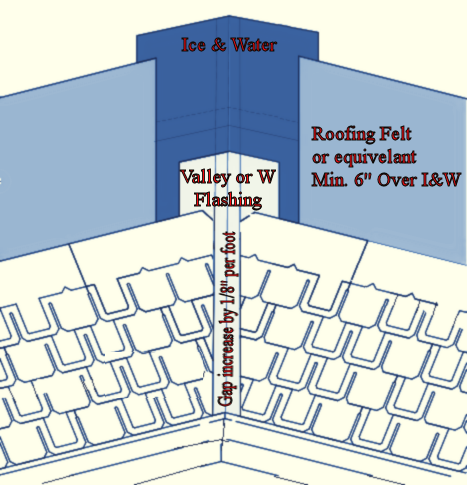
This is a diagram of my preferred method. You should first clean out the valley & lay down a 3’ strip of Ice & Water membrane & follow this up with a W Valley style flashing. I generally do this to help prevent the dreaded “what part of don’t walk in the valley didn’t you understand?” While some like trimming down 3-tab shingles for a starter strip (or add tar), I generally use starter strip & make sure it is laid out at the angle I need. (At the top of the valley you should have a 2+” gap & it should increase by 1/8” of an inch for every foot of valley).
Penny Wise but Pound Foolish x 2:
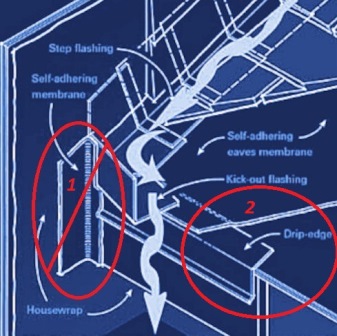
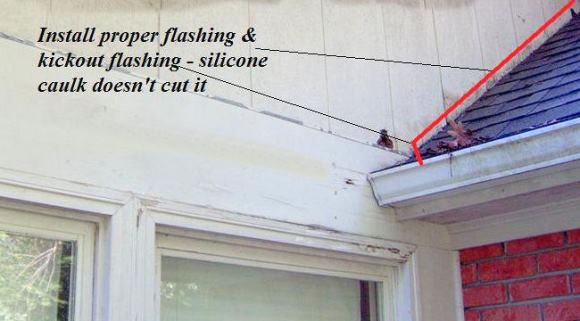 Ah yes the dreaded, who needs to install step flashing or even a kick out flashing? Well in order to clear this up, the minimum you can do per code is; “R905.2.8.3 Sidewall flashing. Flashing against a vertical sidewall shall be by the step-flashing method. The flashing shall be a minimum of 4 inches (102 mm) high and 4 inches (102 mm) wide. At the end of the vertical sidewall the step flashing shall be turned out in a manner that directs water away from the wall and onto the roof and/or gutter.”
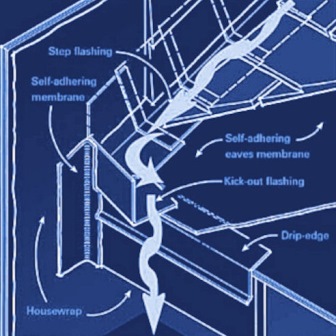 While this is a nice diagram of how these flashings work don’t forget our 5th design rule… “Think like a drop of water does.” Do you see the issue(s)???
.
.
.
.
.
 .
.
.
We will actually get to the 2nd item in the next section, but you might notice the part we struck through – yeah that is not a good practice as any water that gets behind or under the flashings now only has one way to go & that is inside the structure. I generally prefer to wrap I&W up the vertical wall at least 6” to 8” and make sure it extends past the kick-out flashing.
 So why not just use Ice & Water as the flashing? Well the issue is UV rays degrading the material. As most sidings specify an inch or two gap that must be covered by another material that won’t be affected by the UV rays. So why not just use Ice & Water as the flashing? Well the issue is UV rays degrading the material. As most sidings specify an inch or two gap that must be covered by another material that won’t be affected by the UV rays. |
Drip Edge:
 If you are going to use metal fascia, you really do need to use a drip edge. In fact I really can’t think of any reason not to use one. With that times have changed mainly driven by new materials and lessons learned with hurricanes, ice dams and the like. While we used to install the drip edge directly to the sheathing & then covered that with felt that no longer flies as most manufacturers require that the drip edge be placed over I&W. Unfortunately as we pointed out in an earlier piece most people stop the I&W shield short allowing for water to soak into the edge of the sheathing &/or into the fascia.
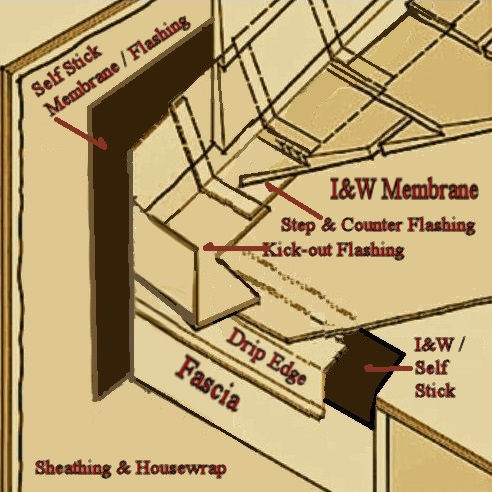
The best method now to protect the whole structure is to use a 6” strip of I&W or self-stick membrane which wraps over the sheathing & onto the fascia. With this the drip edge should completely cover the front of this membrane. The final step is cover over this with I&W, felt or a synthetic overlay. If you really would like a belt & suspenders approach (or you quite simply live in a coastal or high wind area) you may wish to follow Florida’s example & tape all the sheathing seams before applying the overlay.

Great info. I have seen more damaged roofs from improper installation & cutting corners in new home construction that it makes me feel sorry for the owners. We need more new blood in the construction industry that is willing to learn how to do things the right way a d not focus on profits or the bottom dollar. Sometimes a few more dollars spent to do the job right and educating the customer as to why it is money well spent will give you a happier long term customer in the end with more referrals which will mean more jobs in the long run.
Thanks Ken & here here. I do have one small point of contention & that is learning how to do things right & not focusing on profits / bottom line. I think one needs to focus on those numbers while not letting quality / workmanship slide. Not only will this pay off long term as you mention but help create a company that will be around for a long time.
Informational post thanks ……………..
Helo, Nice post.
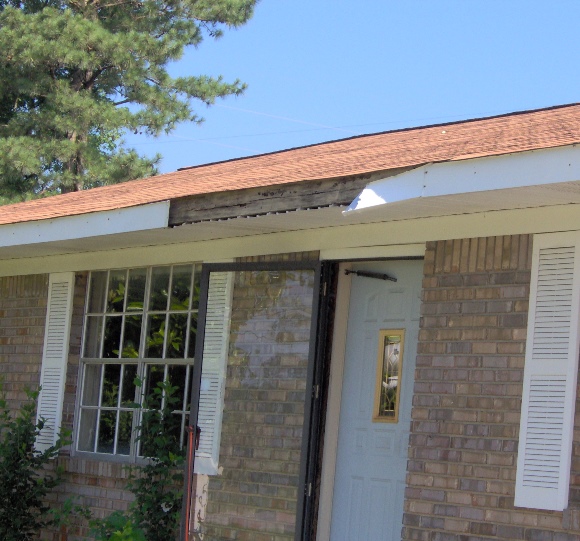
The diagram is nice on the kick out flashing, but it totally changes the way the siding will be done in that area. I don’t think the typical homeowner will be able to correctly do this without a picture showing the siding detail. If all that had to be done was what is shown in the diagram….it would be a lot easier, but there is more to it and that’s one of the reasons it doesn’t get completed correctly.
Thanks
roofersadvice com
Thanks for chiming in & true one also needs to adapt the siding but manufacturers provide those directions for both professionals & homeowners alike. By skimping or skirting these steps one voids not only the roofing but siding warranties.
🙂
I had a new roof put on a cedar house,it had two sets of shingels ,that were removed.New roof,New step flashing,but i see I have a small water spot on a ceiling that is under a bed room. my thought is I see quite a bit of flashing where previous roofer cut siding to install second set of shingels over the first set .could this be a problem,& how to fix it
Unfortunately I can’t see what you are talking about or the layout – with that, an incorrect lap, miss nailed piece, flashing done incorrectly or any host of other items could lead to an issue. With that said & with the weather changes you could also have a condensation issue. The fix, figure out the problem & go from there
thank you
I will be doing a butt up reroof on a gable roof over one layer of roofing do I need to use new edge flashing on the sides and bottom?
Can I talk you into tearing off the old, making sure everything is good, and doing things right? That would be the best advice. Beyond that generally no as you would overhang the existing shingles by a good 1/2 to an inch.
We have a barn and a garage 16′ apart (60′ long)and added another trussed roof between them. On the garage side there’s a 4″ height difference so we added a special made flashing under the tin which works great-no leak problem…on the other side the roof tin meets a 20″ W valley (10′ sections) and because of it’s size the rain water leaks into the barn even if it’s a moderate shower. We weren’t told about sealing the valley sections until after we had installed the roofing tin and have several boards that have extensive water damage. We intend to tear the tin off this summer and reseal the sections properly and replace the damaged boards, but do you have any other recommendations for a water-tight seal. Enclosed are photos of the roof as we were building it last year. Thank you!
Unfortunately I don’t see any pics but make sure you get your sheathing fully supported, use I&W (you can even go wider & use it instead of felt). The other big issues I see is to make sure you allow for at least a 4 to 6 inch overlap of pieces and that it extends out past the fascia. With that follow the manufacturers directions for installation on how to seal / block water from coming under the tin – some have interlocking edges others use a channel, etc…
Thanks for chiming in & true one also needs to adapt the siding but manufacturers provide those directions for both professionals & homeowners alike. By skimping or skirting these steps one voids not only the roofing but siding warranties.
Great info. I have seen more damaged roofs from improper installation & cutting corners in new home construction that it makes me feel sorry for the owners. We need more new blood in the construction industry that is willing to learn how to do things the right way a d not focus on profits or the bottom dollar. Sometimes a few more dollars spent to do the job right and educating the customer as to why it is money well spent will give you a happier long term customer in the end with more referrals which will mean more jobs in the long run.
Thanks Ken & here here. I do have one small point of contention & that is learning how to do things right & not focusing on profits / bottom line. I think one needs to focus on those numbers while not letting quality / workmanship slide. Not only will this pay off long term as you mention but help create a company that will be around for a long time.
Informational post thanks ……………..
https://uploads.disquscdn.com/images/97ff0c150c50668a2324210609d9420a2a8eb43de27908df803da4ad1d9652f8.jpg
My flashing that is at the garage roof and side of house is huge and covering the siding. Should this be how it is installed.
Can you cover bathroom vents with metal roof?
Ouch & sorry but that is just all sorts of wrong. Counterflashing should be over the (for better lack of term) flashing with WRB & siding over that. For metal they don’t use step flashing as described in the article about but rather one piece. Beyond that essentially everything else applies.
NO – bathroom vents should never be covered – https://thehtrc.com/2013/getting-details-right-bathroom-exhaust-venting – they make special exhaust vents for going through the roofing that the ducting attaches to