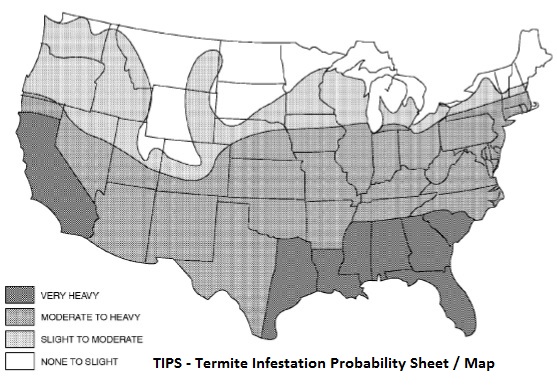
 With all the damage that termites are known for, it is amazing how silent many of the green / energy efficient programs are on them. Granted both LEED (points for use of non-toxic pest control) and NGBS (use a shield in conjunction with a low-toxicity spray) mention them, but finding detailed drawings, best practices…. yeah, it isn’t happening. Shoot, even GBA which has hundreds of design details for almost every conceivable item, doesn’t have one & all they state is…
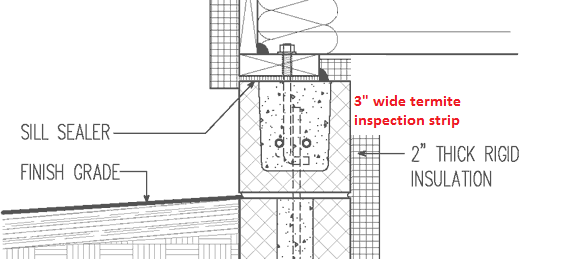
Termites are a serious threat, so make it easy to see them; Termites build tubes of mud and wood fiber across exposed surfaces they can’t tunnel through. These tubes will be easier to see if they are exposed. Rigid foam insulation that completely covers foundation walls gives termites a place to hide. An alternative construction detail (such as interior foundation insulation) should be used in areas where termites are a recognized problem…
Unfortunately while this sounds good in writing & the detail looks nice… as mentioned before codes & reality don’t make it that simple. Code require a 6” band above grade on the inside and if one wants a termite bond, well they may require a 3” wide inspection band resulting in this…
Defense in Depth:
When one starts talking about controlling moisture, air, heat, etc… we end up discussing control layers & how they integrate together. If you are looking at stopping termites, carpenter ants & other critters from making your house, their home; you may need to start thinking about an additional layer or two & how they integrate into the other layers.
 Building a new house & don’t want termites around??? It is really simple, don’t be stupid & invite them in. Big stumps, wood cutoffs, paper wrapping, drywall, etc… should not be buried in the ground around the house – get them off your site or place them in a compost pile located away from your house. Along those lines, watch your other control layers & keep water away from the house – no saturated wood, mud, damp mildewy areas will generally keep them at bay – remember only a few see, but they all go off of smells & vibrations. Building a new house & don’t want termites around??? It is really simple, don’t be stupid & invite them in. Big stumps, wood cutoffs, paper wrapping, drywall, etc… should not be buried in the ground around the house – get them off your site or place them in a compost pile located away from your house. Along those lines, watch your other control layers & keep water away from the house – no saturated wood, mud, damp mildewy areas will generally keep them at bay – remember only a few see, but they all go off of smells & vibrations. |
The best layer to start with is a chemical barrier, but as pointed out before, one is lucky if they will last 15 years. Does that mean that one should just do away with it – not necessarily but it is important that it is applied properly & any work that might disturb the treatment has already been completed. This brings us to using additional protections that forces them to make their activity more visible.
Slab on Grade:
Termites can’t get through a slab… can they? No not really but as concrete is a natural product and will crack, the termites can get into your house that way, or by simply following the plumbing penetrations. Here are a few options to consider:
- Stainless steel mesh is often used around penetrations, to protect foam, etc…
- You may consider using plastic sheathing with a repellant built in
- Termiticide sprayed before plastic &/or foam placed
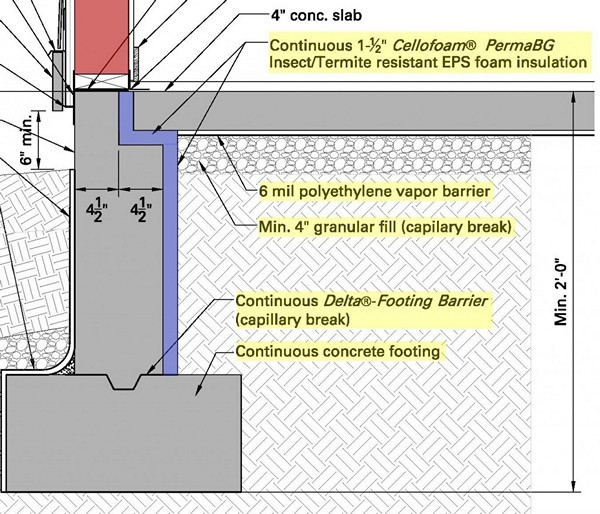
This one comes to us courtesy of Chris Laumer-Giddens of LG Squared in Atlanta which needless to say is located in a “very active” TIP zone. This shows how he was able to still use foam even though he could have had a pass on it per the “codes.” If I had to nit-pick just a little the plastic & foam should be tied together instead of just butting together as is shown (which was probably done.) With that said, if you want to see what a highly detailed plan looks like, you ought to see the full article linked above.
| Details count, especially when you consider that termites only need a 1/32 of an inch to get in. Make sure you follow the manufacturer’s directions for installing mesh, plastic & other shields as the bonding cement or epoxy is what makes them tunnel out instead of slipping by. |
As for other options, I would rather see a spray being applied directly to the ground instead of using plastic with a repellant built in unless it was a very heavy-duty version. The biggest catch with most plastics is they are torn to shreds when the concrete is installed which does nothing for moisture, termites, or especially radon control.
Crawl Spaces & Unfinished Basements:
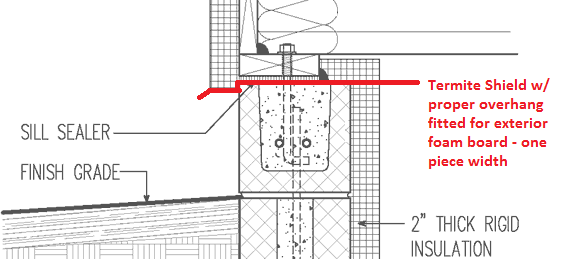
Whether you have a crawlspace or a full basement, the only real difference when it comes to termites is the height of the wall until one reaches the framing. Beyond using sprays & other materials it is well worth looking into termite shields. A typical metal shields extends out 2 to 3 inches on both sides of the wall with at least the outside portion having a 45 degree lip on them to not only allow water to drip off but prevent other insects from getting past.
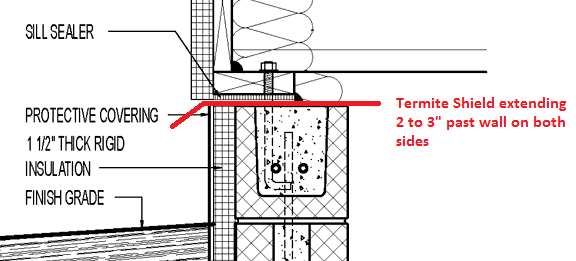
Using an integrated or custom shield can definitely be worth looking into even more when you consider how many of today’s finishes & wall systems require drip edges, termination bars & other items. Creating a one piece integrated system isn’t to hard when planned out up front & in some cases can save you from a major headache later on when you are trying to fit 2 or 3 separate systems together.
Post & Beam / Pier systems:
 This is an example of a cap for a pier. For decks & other locations a Post Base Anchor located above grade is a good shield, but like other areas they need to be checked every so often. For anyone that thinks that pressure treated wood is impervious, just bury a post or two in the ground & check back on them later.
.
| The biggest issue with most termite control measures is time. As listed most sprays last 15 years or less, impregnated materials maybe 20 years. Galvanized metal – ooh that can be crapshoot but unless they are in extreme conditions – 30 years? They actually make copper termite shields that should easily give you 50 years or more. Hmmm, so why not use plastic for termite shields? My guess is they are worried about UV degradation & weed eaters damaging them for the exterior side though there are plenty of types for pipe penetrations. With that, using shields especially when combined with sound moisture control & routine maintenance can pretty much guarantee you that the shields & house will be there and last a very long time. |

Florida has subterranean termites that can bore right through concrete and steel. I have seen the holes in steel bolts. The subterranean love foam as it protects them from heat.
Ummm I would love to see a picture of that & thanks for chiming in. With that termites do not bore through solid metal or concrete – they just need a small little crack or gap to squeeze through & it can appear that they bored through (especially concrete walls / footings).
As for them loving foam – I have yet to see one with a t-shirt on that says that, but yes foam can protect them from heat which coincidentally does the same for us.
Depending on ones area, there are things to consider, but just disregarding a material due to folklore &/or ignorance is not a good reason. Just like every other aspect of the building one has to look at what impacts what & then how that or making a change fits together with other items & go from there
If you keep the indoor moisture low with well designed HVAC, how much do you think that would help? Here in Cleveland I’ve only seen termites a few times, and then only with really wet assemblies in crawlspaces or where ice dams leaked for years.
Hmmm good question & my gut answer is probably very little. As you mentioned the issues involved not with interior humidity levels but external sources. Also having lived in Phoenix (which everyone knows is only hot but not humid) they have big issues with them.
Interesting. Low humidity keeps bugs out of interiors of buildings, so that part I’m used to. That’s not where termites live, though. A problem I hadn’t given any consideration!
I think, keeping the external edges of one’s building, hand-sprayed with salt…does reduce termites’ reproduction.
Interesting thought, though I got to say while salt has been used to help repel it doesn’t really do much for their reproduction nor their appetite if they manage to work their past it. The other catch is much like some of the others – how do you keep it from wearing away & just how much salt is needed to accomplish this