 Recently the NAHB Research Center (now known as Home Innovation Research Labs) in conjunction with DOE’s Challenge America Program released a new paper touting three new “Advanced Framing Techniques”. As you may recall I have pointed out multiple issues with OVE / Advanced Framing & actually promote using OFT or Optimized Framing Techniques. With that, I was interested in what these new techniques were & how well they might work in the real world. I also got to say it is nice seeing the Research Center doing what they are meant to do once again – find workable solutions for builders to not only meet codes but also build better & more efficient homes more affordably.
Creating a continuous path for drywall on exterior walls:
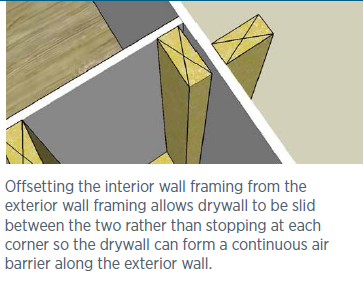 The first technique involves a new way of framing interior walls. Instead of promoting the use of drywall clips, using a T Block, or ladders they are pushing for one to hold the interior wall partition away from the exterior framing by an inch. In order to provide the structural stability needed for the interior wall they would get tied together with a flat plate connector.
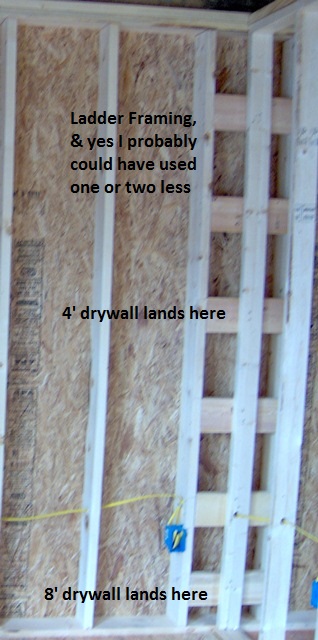 What this allows for is the drywall contractor to “slide” full sheets behind the partition walls to help create a continuous interior air-barrier. At first blush this looks & sounds like a really good idea which many of us have considered before. The catch – numerous walls & small spaces would make this very hard to pull off but still very doable. The biggest catch is shown in this picture where we used the ladder technique – yep that would be electrical & in some cases plumbing runs. Ahh but cant you drill in from above, below or any combination – sure you can, but you want to make sure that everyone knows that is what is supposed to happen & make sure you are not creating any other issues by doing so.
Eliminate 1st Floor Headers:
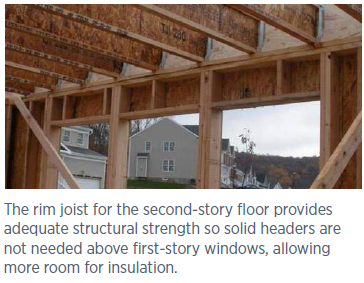 The second method is for 2 story houses only. Per the Research Centers testing, they have deduced that headers are not required for the first floor as the rim-joist & “normal king & jack studs” provides enough load carrying abilities. Granted I am not a licensed engineer, but I would definitely be checking with one before I tried this trick.
I also have to say I have a few quick questions based off this photo as they appear to have used a doubled up rim joist using solid wood (not the more traditional single OSB rim joist band which is more commonly used.) It also appears that they doubled up on the king studs based on the opening size. You may also notice that they mentioned using both normal king & “jack” studs which as many proponents of OFT would almost consider sacrilegious.
Continuous Sheathing for Raised Heel Trusses:
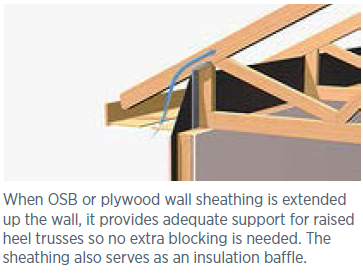 Ok, seriously? While I am a big proponent of using continuous sheathing, calling that new, much less a framing technique is a major stretch. With that it is good to see them supporting & pushing out to their members a code tested & required measure. For more on how to do this: Common Sense Building: Exterior Wall Sheathing 101
Ahh, but you said 4?
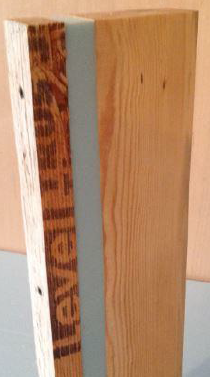 Why yes I did & this one came from a gentleman in Rhode Island who asked a what is it question. In his case, he was talking about a home-made version (albeit from a lumberyard) of SIL or Structurally Insulated Lumber. Unlike the one pictured, his consisted of a 2×4, 2″ foam, & 1/2″ OSB all screwed together. While I wouldn’t have an issue per se using one that is properly designed, I wouldn’t waste the money or time on it. One would achieve better results with a conventionally framed wall, sheathed with OSB, & then wrapped with foam. To top it off a properly done rain screen detail would give you an almost bullet proof system.

Actually, that first one is so old that it only seems new because it hasn’t been used much. Joe Lstiburek was doing this in the early ’80s in Canada and wrote about it way back then. I’m trying to get a hold of that paper.
Hmm thanks Allison & now that you mention, I think I recall seeing that also – funny how so many ideas get recycled. If you don’t mind & you find the link, I would love to add that above. Thanks
I frame a 2 x 4 wall, 16″ on center (don’t see much point in 24″ O.C. as openings and partitions generally obviate any reduction in # of studs). Leave out any stud in the layout that is close to an opening or partition so long as there is no space between studs greater than 24″. CA corners, double rim joist over openings with joist hangers. Then I install 2 x 4s horizontally 24″ on center, creating a 7″ exterior wall. At openings I put the 2 x 4 on the flat so there is a thermal break. Fill the wall with spray foam. At the rim joists there is a 3 1/2″ thermal break. Use let-in rough sawn 1 x 8 for lateral bracing.
Thanks for chiming in Robert & interesting method – just curious have you considered or looked into Larson Trusses / using I-joists vertically? You might like that approach
does anyone here know what are basic requirments for attics access in Moody, alabama
Well at minimum you fall under the State Code which is the 2009 IRC Section 807 which requires at least 30″ in height & minimum 22″ x 30″. If you have any appliances up there you fall under the mechanical code – 1305.3.1 which requires the opening to be wide enough on all sides to allow it to pass through (not including a walkway – https://thehtrc.com/2011/air-sealing-attic-walkways-storage). If in doubt you should consult with the local building official
I am curious why if you used the drywall spacing techniques would you use the ladder? You do not need drywall corners because you are going through the room corner.
Also the removal of the 2nd header board is only allowed in the cases where wall stud is directly under the floor joist. The picture you showed may be an exception since they had hangers on each joist to help ensure the weight is distributed.
Thanks Daniel & for the first one you wouldn’t – I prefer the ladder method and used it as an example of issues you can run into (i.e. electrical running through the area where you want to slide the sheet)
I think you are missing the point on the second – there are no window headers as the load is carried by the rim joist. I think you might be confusing the removal of the second top plate with the joists that must line up with each other
Thank you it is much clearer now. I do understand the load distribution with the way they use hangers. The board the hangers are attached to is honestly acting as the header. I think if you removed the hangers and only used a nailed board you would see issues.
#1 is obvious and makes things easier tbh
#2 Why would you waste the money on joist hangers if you are going to have it bear on the wall anyways? I would like to learn more about it and about headers let into the studs.
#3 Isn’t that required anyways?
#4 Umm that is a lot of work, and that many screws and a ton of labor gets expensive?
Thanks for chiming in & in answer to your questions –
#2 because the floor joist is reliant on the rim board & even if it wasn’t you still may need to depending on how much wood it is bearing on. Also in many of the OVE styles with a single top plate the floor joist must be directly over the stud
#3 no, that is new as many required blocking in between the trusses & still used sheathing (generally not continuous for siding) – this makes the sheathing (when done properly) act as the bracing / to prevent racking
#4 all things are relevant and it depends not only what you pay for labor / materials but what you need to design / build to
#2: Hmm i think i found where it was referenced, it looks like they could do it because the load path is 2nd floor joists -> rim board header-> king studs. I was thinking the joists beared directly on the cripple studs to the double top plate, clears it up I guess.
20 ft wide house with center bearing wall, why do u need TJI 560 11 7/8″ joists for such a small span? The extra costs of the hangers doesn’t seem worth it to ommit a header.
Know anything about let-in headers? (notched king studs so header can fit in, no jack studs, or maybe they are required after a certain window width idk)
#4: which side is the osb on(inside/outside)?
Best to consult with an engineer, but you do want to consider flex, loads, etc… The other side of going with larger is you can run ducts inside conditioned space (depending on you layout)
Yes I do but due to fire-blocking requirements, labor, and other issues they are rarely used
OSB is on the outside for the SIL – for a conventionally framed wall from the inside out – drywall, studs, sheathing (OSB / Plywood), WRB, then foam. In some cases the WRB maybe on the outside of the foam – for more on this https://thehtrc.com/2013/common-sense-weather-resistive-barrier
with let in headers I mean to still use top plate, but instead of jack/king studs, notch out the top of the stud to put in the header(much easier to notch before the stud is nailed in ofc). Sort of like let-in-bracing but horizontal at the top of the stud and sized for the opening.
Actually, that first one is so old that it only seems new because it hasn’t been used much. Joe Lstiburek was doing this in the early ’80s in Canada and wrote about it way back then. I’m trying to get a hold of that paper.
Hmm thanks Allison & now that you mention, I think I recall seeing that also – funny how so many ideas get recycled. If you don’t mind & you find the link, I would love to add that above. Thanks
does anyone here know what are basic requirments for attics access in Moody, alabama
Well at minimum you fall under the State Code which is the 2009 IRC Section 807 which requires at least 30″ in height & minimum 22″ x 30″. If you have any appliances up there you fall under the mechanical code – 1305.3.1 which requires the opening to be wide enough on all sides to allow it to pass through (not including a walkway – https://thehtrc.com/2011/air-sealing-attic-walkways-storage). If in doubt you should consult with the local building official
I frame a 2 x 4 wall, 16″ on center (don’t see much point in 24″ O.C. as openings and partitions generally obviate any reduction in # of studs). Leave out any stud in the layout that is close to an opening or partition so long as there is no space between studs greater than 24″. CA corners, double rim joist over openings with joist hangers. Then I install 2 x 4s horizontally 24″ on center, creating a 7″ exterior wall. At openings I put the 2 x 4 on the flat so there is a thermal break. Fill the wall with spray foam. At the rim joists there is a 3 1/2″ thermal break. Use let-in rough sawn 1 x 8 for lateral bracing.
Thanks for chiming in Robert & interesting method – just curious have you considered or looked into Larson Trusses / using I-joists vertically? You might like that approach