 Lately there have been some questions on just when should I or how early can I do a Blower Door Test. This is also referred to as an air leakage or envelope leakage test (aka as the second part of the DET code mandated testing). This is quickly followed up by what do I need to due to be ready… In this piece we are going to focus on code mandated testing (2018 version) & follow up with an FAQ to cover numerous other topics.
The Test:
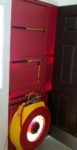
In essence the test is done by setting up a blower door like the one above to depressurize the house to 50 Pa (Pascals) with respect to the outside. We get a number of how much air it takes to keep the house / building at that level and convert it to an ACH or Air Change per Hour Reading to see if you pass or fail.
The IECC & referenced standards
 Starting with the 2009* IRC the codes have mandated that a Blower Door Test be completed with no exceptions. Now this next part can be a little dry, so you might want to skip to the section below or simply download the blower-door-testing-checklist. For those curious about the differences in the standards read on.
*2009 allowed for either a visual check &/or blower door test
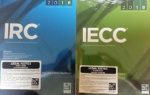
Unfortunately for most AHJ & even some of those doing the testing they referenced ASTM E779 or ASTM E1827 as how the testing should be done. Why unfortunately? Well not to many are willing to shell out the money required to buy said standard which was written by engineers (i.e. hard to read / clear as mud). For the 2018 code cycle ANSI/RESNET/ICC 380 was added as an additional referenced standard. Fortunately it is available for free but for online viewing only.
The two following charts are based on said standards; the first covers many items located in a home & there position for testing. The second covers some of the testing protocols allowed (single point testing / multi point testing). As for the math – the RESNET one references 779 mainly but in all honesty just use the appropriate software to do the calculations.
| Item – followed by position based on standard | 380 | E779 | E1827 |
| Ext. doors & Windows | Closed | Closed | |
| Closet Doors | *Open | Closed | Open |
| Interior Basement Door – Conditioned | Open | DPR | Open |
| Interior Basement Door – Floor Insulated | Closed | DPR | Closed |
| All other interior doors | Open | DPR | Open |
| Garage Doors & Windows* | Closed | Closed | |
| Unvented Crawlspace Interior Access | Open | DPR | DPR |
| Vented Crawlspace Interior Access | Closed | ||
| Vented Crawlspace Vents | As-Is | ||
| Encapsulated Attic Interior Access Hatch | Open | DPR | DPR |
| Vented Attic Interior Access Hatch | Closed | ||
| Exterior Attic Hatches, Vents, Dampers | As-Is | ||
| Attic Vent Fans | Turn Off | ||
| Chimney Dampers & Air Inlets | Closed | Closed | Closed |
| Chimney Doors | Closed | Closed | |
| Fireplace Ashes | Removed | Removed | |
| Combustion Gas Vents | As-Is | As-Is | |
| Naturally Drafted Appliances – Turn To | Pilot | Pilot | |
| Running Fans; Dryer, Bath, Kitchen, Ventilation | Turn Off | Off | |
| HVAC | Turn Off | Off | |
| HVAC Supply & Return Grills / Jumper Ducts | As-Is | As-Is | As-Is |
| Window Trickle Vents | Closed | ||
| Dampers – non motorized | As-Is | As-Is | |
| Dampers – motorized | Closed | Closed | |
| Non Dampened openings (except below) | Open | Open | |
| Continuously Operated Non-Dampered Ventilation Openings at Exterior | Seal if possible | Seal if possible | |
| Whole House Fan – Louvers / Shutters | Closed | ||
| Evaporative Cooler Opening (if it has closing system) | Closed | ||
| Seasonal Covers if readily available | Install |
Test Methods – if blank I didn’t see anything addressing that
| Item – followed by position based on standard | 380 | E779 | E1827 |
| Record Temperature Inside Start | Yes | Yes | |
| Record Temperature Outside Start | Yes | Yes | Yes |
| Record Temperature Each Part of Multi Point | Yes | ||
| Record Temperature End | Yes | Yes | |
| Record Altitude | Yes | Yes | Yes |
| Single Point or Multi-point | Either | Multi | Either |
| Pressurize or Depressurize | Either | BOTH | Either |
| Time period (Baseline & Readings) | 10 Sec. | 10 Sec. | |
| Baseline Adjusted – Single Point | Yes | N/A | Yes |
| Can’t Reach 50 allowed with Equation – Single Point | Yes | N/A | Yes |
| Temp & Altitude Adjust for Single Point | No | N/A | Yes |
| Multi Point Minimum Test Pressures Minimum | 5 | 5 | 2 |
| Multi Point Test Range (Min. / Max) | 10 / 60 | 10 / 60 | 4 / 50 |
| Multi Point Spacing | Equal | 5 or 10 | See Std. |
| (DPR) Differential Pressure Readings Inside | Yes | Yes | |
| Stack Pressure Calculation & Pass/Fail Required | Yes | ||
| 3 story Building requires additional Exterior Tubes | Yes |
The Codes & the Test
First one thing to keep in mind – the test is Mandatory, there are no exceptions (Yes folks, if you have a “statewide code” that applies to all homes even if the AHJ doesn’t mandate it). With that the codes are lenient on the testing method used & when (see below); just simply stating that one must be at or below 3 or 5 ACH, the three allowed standards & that the code officials may require an independent third party conduct the test. With that, there are 6 items specifically listed in the code that apply to testing (yes they even override the referenced standards above):
- Exterior doors, windows & fireplace/stove doors shall be closed & not sealed beyond normal measures (i.e. don’t apply tape around door edges) TIP: make sure all windows are latched closed & deadbolt locks are engaged (with the exception of the test door way)
- Dampers shall be closed but not sealed beyond normal measures
- Interior doors shall be open (Please note nothing states that closet doors are exempt)
- Exterior or interior terminations for continuous ventilation systems shall be sealed (earlier codes state only exterior)
- Heating & Cooling systems shall be turned off during the test
- Supply & Return registers shall be fully open (i.e. not sealed with grill tape for duct testing though some read this as the register may not be partially closed or closed at all even for balancing)
When Should I Test?
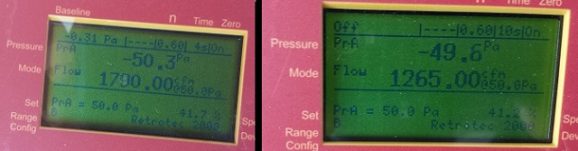
Based on 402.4.1.2 “Testing shall be performed at any time after creation of ALL penetrations of the building thermal envelope.” So theoretically you could do this after your rough in inspections are done (assuming water, gas, electric, cable, ventilation, exhaust / dryer runs, etc… are in.) The issue, well most builders utilize vented roof systems so instant fail. How about just after drywall? Also theoretically possible but your chance of failure is also high. Below is a picture of the same house taken 3 days apart. The difference, all the appliances, register covers, outlet covers, carpet, etc… were now in & the painters were just finishing their touch-ups.
So the best time is essentially when you are ready for your final inspection and everything is done. This is especially true if you are utilizing the ERI option or pursuing some other type of above code certification. With that said if you are utilizing spray foam / really want to knock out air-leakage, doing the test early is definitely worth considering. We will cover this more in the FAQ piece.
Testing Checklist:
Below is a quick checklist of things to do & not do based on hundreds of tests to help you out.
Before Test:
- Try to schedule as far in advance as possible providing Square Footage / Conditioned Volume (if known – generally on Manual J) &/or plans to tester
- Pay attention to your air barrier & air sealing efforts as you go
- Make sure all work is completed in the house – toilets, sinks, outlet covers, etc… are installed – no one can enter or leave while testing is happening
- Do not cover or block off any exterior vents or grills especially the dryer vent (even if not installed)
- Clean out fireplace of any ashes – close dampers & door
- Close & latch all windows & trickle vents
- Install any seasonal covers to Evaporative/Swamp cooler, Window AC Units, &/or Whole House Fans
- Leave all bathroom & kitchen exhaust grills open & uncovered
- Leave all HVAC supply registers and return grills open & uncovered
- Make sure all exterior door weather-stripping is in place
- Make sure attic access hatch has weather-stripping in place & hatch is closed
- Run water & make sure all P-Traps are filled (sinks, toilet, bath, shower, floor)
- Make sure all covers are in place; sump pump, future plumbing (basement)
At Test Time:
- Inform any trades still working that they cannot open any windows / hatches, turn on any vents, enter &/or leave while testing is going on
- Lock & deadbolt all exterior doors minus the one where test is happening
- Verify items above are still completed – windows latched, attic hatch, etc…
- Close all garage doors (unless we have to use the garage)
- Open all interior doors including closet doors
- Seal off “continuous” running ventilation openings at exterior or interior
- Turn off AC / Furnace – sometimes best to flip switch on unit
- Turn off all fans, including continuous exhaust, kitchen, bath, HRV/ERV
- Turn to Pilot – any natural draft appliance (i.e. Hot Water Heater)
After the Test:
- Uncover continuous operating vent covers
- Turn HVAC & Ventilation systems back on
- Turn Water Heater & other items back to on position after verifying pilot light is still lit
Downloadable version: blower-door-testing-checklist
