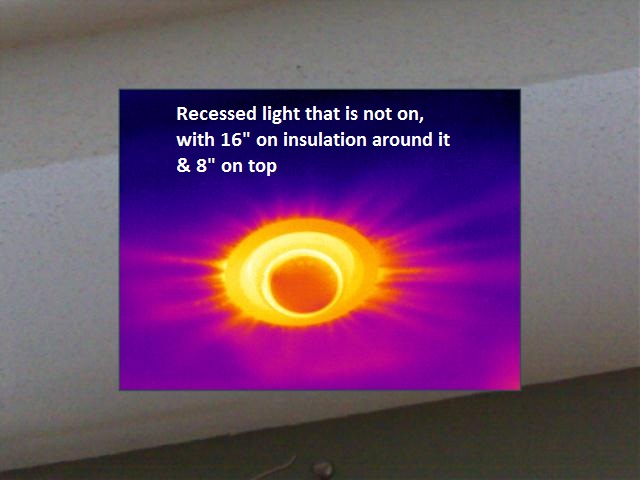
 Adding more insulation in your attic is often seen as one of the easiest ways to help save money and increase comfort in your home. While this is generally true, all too often the items need to be done are either simply overlooked &/or buried. That is one reason why we have held off on this article until we covered what is required like; sealing up all those pesky air leaks, insulating the attic hatch, creating a walkway if required, and installing insulation baffles. For most homeowners once these items are taken care of, it is time to insulate the attic properly which leads us to…
Batts, Loose, Dense, or:
There are two commonly known ways of insulating an attic, using batts (commonly fiberglass) or loose fill material (commonly cellulose). While fiberglass batts may appear to be a cheaper alternative at your local hardware store, they hardly are the best choice in many attics do to all the wires, pipes, and other obstructions one must work around. In order for the batts to perform even remotely close to their given R-Value, they must be placed in the cavities with no compressions or gaps. Additional layers are added perpendicular to the first ones until you hit your intended target. Do to this & knowing that fiberglass starts to lose its effectiveness the hotter it gets, I don’t recommend using batts or fiberglass at all in an attic space.
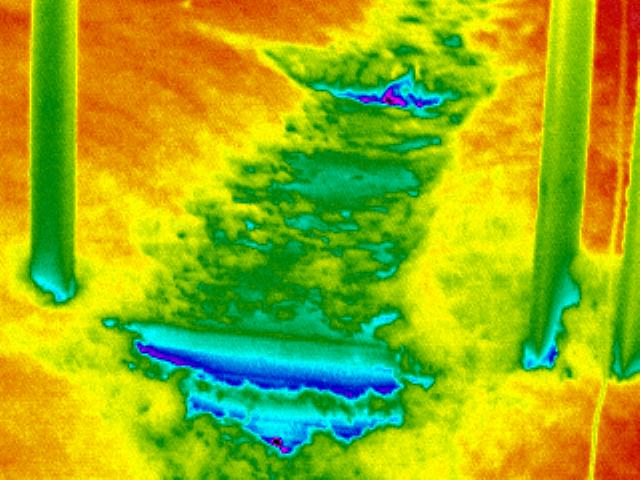
Loose fill or blown in insulation is the best system a homeowner can use to insulate their own attic, as long as it is done right. Unlike Batt insulation, blown in products come in a bag and have a table showing how many bags are required to be used based on the square footage to be covered. While companies are required to post rulers in the attic space to measure how much blown in insulation was installed, there have been issues with them injecting more air in the product which artificially inflates its thickness (well until it settles), thus the requirement relating to bag counts. As noted in this article on Energy Vanguards site “Flat or Lumpy,” even though the attic had enough bag insulation blown into it to provide a uniform R30 value throughout, it basically performed at little over half that value. Along those lines & hoping a picture or two is truly worth a 1000 words…
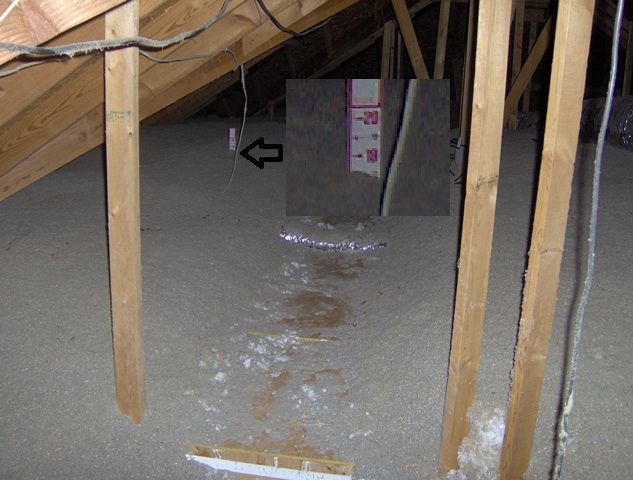
Visual picture & yes that is 17” in that area, the other side is at 16”, under the walkway there is about 3 ½” inches of insulation — which leads to this infrared photo of the same spot…
Dense packed insulation can mean and is called a number of different things depending on your area. Most commonly it is referred to when an insulation material is blown into a cavity to reach 3.5# of density. If you have area’s that are covered by floor boards, or a walkway, those need to be filled utilizing that method. Another version involves cellulose with a glue binder that is added & sprayed into place. Unlike wall assemblies where they use a spinning screed or rake to make it even with the studs, it is simply left sprayed to a uniform depth and left covering the ceiling joists. This system will generally far out perform the other ones, but requires a company and a great installer to do it.
How about foam?
If you are seriously thinking foam, you ought to consider going with the hot roof option which is generally a far more superior option. If you do move forward, be advised that even though a recessed light fixture is rated IC (Insulation Contact) does not mean that it is rated for foam insulation – it only applies to cellulose, fiberglass and other products that will more easily allow for convective heat losses. The other main item to remember is that any remodeling work, electrical, or plumbing issues will be that much tougher in the future.
How Much is Needed?
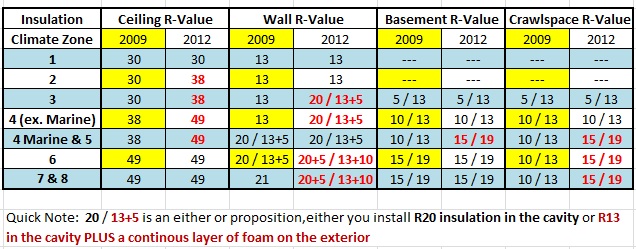
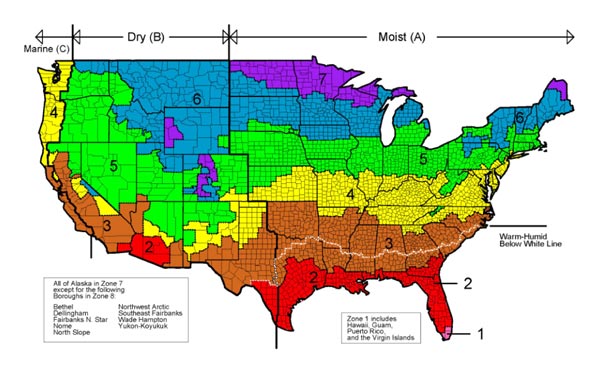
Below is a chart of the minimum required insulation values based on your climate zones which is shown on the map below that. With that said, at minimum I would recommend you use the values shown in the 2012 section, if not more. Many auditors in the northern climates I have talked to recommend up to R60 in the attics at a minimum. My recommendations vary based on the house & range from R38 at a minimum up to R60. Why the difference – well there are numerous factors including why the code minimum is overkill for many hot-roof assemblies.
Danger Will Robinson, Danger:
Besides the previously discussed issues with Recessed Lights, vents not venting outside, illegal or older wiring, one major item in new homes that bears repeating is insulating around chimneys, flue pipes, etc… which leads us back to the article on Air Sealing the penetrations & this paragraph;
The first rule when dealing with any type of exhaust is to be careful of them, because if you do dislodge them, you can open up a gap allowing the carbon monoxide or other gasses access to your attic and get back into your house. The second rule is to know what type of pipe you do have; is it for a bathroom exhaust fan, the kitchen or for your furnace? If there are any doubts, something doesn’t look right or it isn’t the exhaust pipe for your bathroom, we reach the third rule; call in a professional that understands what is required. The code requirements vary based on the appliance, the size and type of the pipe, the manufacturer’s directions, etc… In many cases a 3” gap needs to be left around these items & they need to be fitted with a metal guard that extends 2” above the level of the insulation.
DIY or hire a pro:
This might actually floor you, but in many locations hiring a pro to install the insulation will cost you the same amount as doing it yourself. There are two factors in play with this and that is the size and power of their equipment, topped off by them buying the material in bulk. As for all the air sealing work, installing baffles, etc… that is one area where you might not only save, but possibly do a better job than many of the companies out there.
