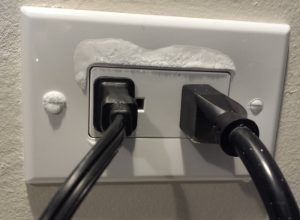
 It seems like every winter the question pops up – why are my windows sweating / have so much condensation on them. It seems invariably that someone pops up with change out your single pane windows with double or triple paned windows… which in many cases turns into “sounds good but I already have them and it is still an issue.” Another variation is why is X interior or exterior wall wet? Shoot why does this outlet have ice on it?
 Not all windows are created equal – if you are buying new see if they have a CR rating on the NFRC label. Condensation Resistance (CR) is expressed as a number between 1 and 100, and rates the ability of a product to resist the formation of condensation on the interior surface of that product. The higher the CR rating, the better that product is at resisting condensation formation. Not all windows are created equal – if you are buying new see if they have a CR rating on the NFRC label. Condensation Resistance (CR) is expressed as a number between 1 and 100, and rates the ability of a product to resist the formation of condensation on the interior surface of that product. The higher the CR rating, the better that product is at resisting condensation formation. |
Dew Point:
In all cases the root cause is because a surface has reached the “dew point” level aka where the surface is cool enough to allow condensation to form. Below is a chart many use to find out when this will happen & it is called a psychometric chart.

- A = The temperature of an object which will allow moisture to form (aka saturation point – where the air can not hold any more moisture)
- B = The red lines represent the humidity level – in this case inside the house (The letter is right on the 50% humidity curve)
- C = The amount of water / moisture content of the air (this does not mean much to this discussion except to note that the moisture content does not change as temperatures change unlike the humidity level)
- D = the indoor air temperature of where the humidity reading is taken
In order to read this chart you first need to find out what the indoor temperature & humidity level are and draw a line straight up till you reach the appropriate point. If you then throw in a horizontal line you can see how much moisture is in the air & also what temperature moisture starts condensing
Fix A – lower the humidity level:
 For years many have heard, keep your house between 40 to 60% relative humidity. In cold climates this advice causes many to add in humidifiers to help keep the air inside the house at that level. So with that if you look at the red line, it is sitting at 75° with 60% humidity – in this case any surface at 60° is now a condensing surface. Same temperature at 50% = 55° while 40% = 49°. As you can see by lowering the humidity, you are decreasing possible problem areas.
Ahh but I like to conserve & keep my temperature around 68° (yellow lines) – congrats & even better if you stay at the lower end of the 40/60 level as you are now looking at a dew point of 43°. With that it is worth pointing out that the 40 – 60% is actually a summer ideal, while going even lower is better in the winter months with 20 – 40% being the most popular – personally we stay right around 25% during the winter to help make sure we don’t have any static shocking going around. In this case – the green line shows that we won’t have moisture issues unless it is 31° or less…
 Want an indoor rain garden? The install & fire up a ventless fireplace / space heater & never crack a window open… Why, well because the main by-product of the combustion process is moisture. Want an indoor rain garden? The install & fire up a ventless fireplace / space heater & never crack a window open… Why, well because the main by-product of the combustion process is moisture. |
Fix B – Raise the Surface Temperature
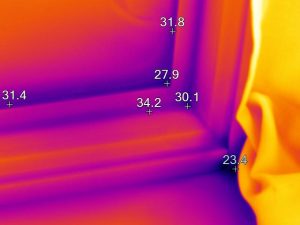
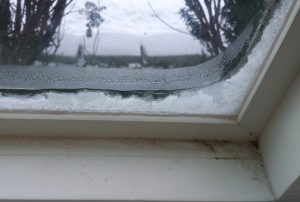
As you can see, controlling humidity levels can only get you so far – this is an infrared shot of the window above when the outdoor temps were just dipping into the negative values – indoor temperature 68° with a humidity level of 26% – yep it shows why there is not only water but ice forming there. Well I can’t lower the humidity anymore, so what is the fix? I could install an interior storm window but that wouldn’t help that bottom corner which is colder even still.
If this was a standard window I could pop the trim off & fill the cavity with some low expanding foam which would take care of not only that one area but possibly the issues above it. Alas this is a bay window that is going to require some fixes being done from the outside during the summer months.
 Can’t I just caulk the crack to help stop the air-flow? In short the answer is yes you can & should (preferably after filling the gap in with low-expanding foam – not fiberglass), just not at this time. You have two issues here, number one the area is wet and needs to dry out followed up by the issue of the temperature at the location – most caulks & paints want the surface to be at 55° or above. Can’t I just caulk the crack to help stop the air-flow? In short the answer is yes you can & should (preferably after filling the gap in with low-expanding foam – not fiberglass), just not at this time. You have two issues here, number one the area is wet and needs to dry out followed up by the issue of the temperature at the location – most caulks & paints want the surface to be at 55° or above. |
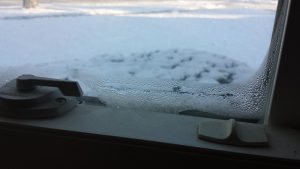
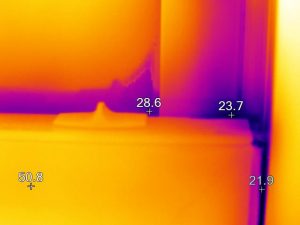 This is another common issue – weather stripping or locking mechanism failure. It always pays to double check
 One popular sentiment today for many involved in weatherization work, is go after the big leaks & not worry about the smaller ones. Some will even start using fancy terms like neutral pressure plane – while it is true that fixing the bigger leaks will result in better savings, ignore the others at your peril. One popular sentiment today for many involved in weatherization work, is go after the big leaks & not worry about the smaller ones. Some will even start using fancy terms like neutral pressure plane – while it is true that fixing the bigger leaks will result in better savings, ignore the others at your peril. |
So what about the walls?
Whether it is an interior wall or an exterior wall, the general catch is why is that one area cooler than the others? In many cases it could be a penetration not sealed, missing insulation, &/or it could also be that your area requires all electric to be run via conduit creating a nice air chase. One other overlooked item is if that wall is not cooler than the others, where might the moisture be coming from? Have a lot of plants in the area, a fish tank, that is where one lets their wet coats dry, or??? Figuring out the root cause will help you determine what the correct fix is.
In the case of the outlet, it is a combination of conduit, missing insulation & air sealing work. Might a foam piece help fix the issue – yes it should to some extent as I probably wouldn’t see any ice on the inside of the house, but hiding right behind it…
