 Uh oh – your on the home stretch, trying to knock out this project so you can move onto another one & bam, you failed the blower door test. Unlike a normal failed inspection where you need to fix one or maybe more items that are clearly spelled out, you are now stuck trying to figure out where & why did this happen, so you can figure out the how, as in how do I fix this? While this is generally rare, it does happen – so what can you do?
In this case we are going to look at one that did fail & rather badly at that as you will see. In this case it was a commercial building, just under 4,000 SF with a volume of 47,832 SF. No worries, while this was a commercial building, the steps are the same for homes and we will add in some specific “residential” tips also.
Verify the settings / test:

- Have them double check their settings & if they have a second manometer, have them use it.
- We have covered this before, but always double check your settings. Having the wrong ring selected can skew the results.
- Make sure they are doing a Multi-Point Test & not a single point test which by the newer codes requires one to add 5% to the leakage number. (For more on that see point below)
 Please note it is very rare that even the same, much less a different manometer will give you an exact match due to conditions changing outside (wind is a big one) when you ramp the system down & then back up. Please note it is very rare that even the same, much less a different manometer will give you an exact match due to conditions changing outside (wind is a big one) when you ramp the system down & then back up.
For the most part the result will be within a 100 CFM, but sometimes vary by up to 300 or more CFM (based on size of place, wind gusts, etc…) which is one reason why one there are 3 different tests. The most accurate is a Multi-Point test. The second is a Multi Single Point where you run the blower door up 50 Pa at least 5 times & average out the results. The most inaccurate one is the single point test which is why one must add 5% leakage to the number reached for code reporting. |
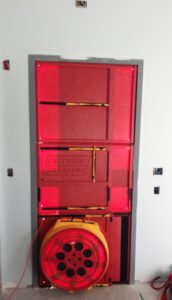
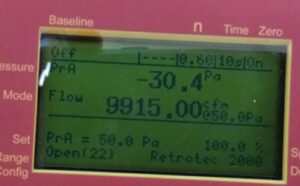
In this case the settings were correct and were within 10 CFM on the other manometer. While we planned on doing a Multi-Point test, at this moment it was meaningless as they were over twice the allowed leakage.
Verify Test Conditions:
Run through the Blower Door Testing Checklist for Builders to make sure things are how they are supposed to be. Some of the biggest items found are:
- Windows not fully sealed
- A door has come open
- Painters left weather striping off the door
- Someone working has opened something up
- Drain pipes / P-Trap (yes even the toilets) not filled with water – that one you can pretty much smell
- Attic hatch not sealed fully
- Atmospheric dampers opened up – make up air for range hood / Supply side ventilation
- While items are running search for drafts by feel, using a smoke stick, or if handy using infrared
In this case someone had opened up the outside mechanical room door but fixing that only brought us down to 7890 CFM or 9.9 ACH. A long ways still to go to reach the 5 ACH we needed for codes at that time. (It is now 4 in Illinois & 3 throughout most of the country based) We searched with Infrared but due to the construction of this building & similar temperatures nothing showed up. The builder had a few ideas but that required a call to the architect & a few other trades so we wrapped it up.
 Infrared is great but it has limitations especially in commercial spaces where the air barrier & insulated walls can be hidden behind dropped ceilings & raised floors. In residential settings you stand a better chance of spotting some issues when you combine Infrared Thermography & a Blower Door Infrared is great but it has limitations especially in commercial spaces where the air barrier & insulated walls can be hidden behind dropped ceilings & raised floors. In residential settings you stand a better chance of spotting some issues when you combine Infrared Thermography & a Blower Door |
Common Things to Check:
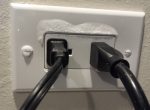
 The picture at the top shows one issue, especially here in Illinois where conduit is required even for residential – the outlets hadn’t been installed & of course the covers were off. Topping that off is conduit is nothing but a raceway for air, so unless you seal up the holes (especially on the outside) air is going to get in.
 Are all air leaks equal? In short the answer is yes and no depending on your perspective. As a builder you might not care where the air is coming from, you just want to pass. In this case most of the list below goes from cheapest & easiest to find. Now if you are worried about potential condensation & comfort issues you might want to spend more time high & low rather than just around a door. Are all air leaks equal? In short the answer is yes and no depending on your perspective. As a builder you might not care where the air is coming from, you just want to pass. In this case most of the list below goes from cheapest & easiest to find. Now if you are worried about potential condensation & comfort issues you might want to spend more time high & low rather than just around a door. |
- Dampers – Dryer & Bathroom Exhaust, these should seal tight with the test running (thus one reason they don’t allow additional sealing) but watch out for birds or wasp nests that may be preventing them from closing tightly
- Don’t have the dryer installed yet? While you are not allowed to “additionally” seal it, per 2018 IRC -M1502.4.7 Exhaust Duct Required: …the exhaust duct shall be capped or plugged in the space in which it originates and identified and marked “future use”
- Check with HVAC company – any atmospheric dampers or other intakes that should be closed only for this test
- Check all exterior doors and windows weather stripping – in place & in good shape?
- Penetrations: this can be big especially with those going into unconditioned spaces namely a crawl space or basement. If it’s the attic… we will cover that at the end of this
- Plumbing Penetrations – Around water supplies & drain pipes coming into the bathroom, kitchen & laundry – seal with foam or caulk, especially true for those over crawl space & unfinished basements. This should not be a big issue between floors if the rim joist was done properly
- Electrical Penetrations – especially on the exterior, in garages or running through unconditioned space – block conduit end with fire caulk or “duct seal” (don’t forget light & outlet in attic
- Recessed lights with attic above – properly installed & weather stripped? Just remember just because a box is labeled IC does not mean “air-tight”
- Bathroom exhaust fans – should be sealed to the drywall with foam & for a belt & suspenders approach also with rated duct tape
- Don’t forget service entrances but pay close attention to what the Cable TV / Satellite guy does
- Ductwork – edges should be sealed to drywall or other finish.
- Granted this is generally only considered a duct leakage issue, but if the ducts run through unconditioned space (especially if one accidentally got disconnected or wasn’t sealed properly) this can add to it
- FYI, check all your duct runs in unconditioned space – an unconnected / improperly sealed duct allows air into the whole system. Hopefully you don’t have any in those spaces.
- Attic hatches has been covered, but one also needs to look at access doors into walls, crawl spaces, etc… as gravity isn’t helping to keep them sealed. Pay particular attention to the weather stripping & closure
- Attic’s – unfortunately you are getting into some money now if this is the area as most have already been filled with insulation. For more on just this subject: Air Sealing: Attic Penetrations
- One other common place in older homes but rare in new construction is the sill plates as everyone uses foam now… right? Oops they forgot, well you can pop the baseboard & caulk at the bottom (just don’t fill the gap between that & the flooring0
21 days later:
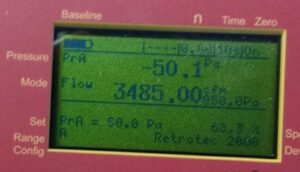
 Whew a pass – 4.37 ACH. The issue was two-fold;
The architect (and some could say builder) failed to do a redline test which had left 4 vents in the raised floor area connected directly to the outside. Oops & then one of the trades had also left an access hatch that no one could see open above the dropped ceiling.
Fortunately while the fix did take time (yes they also made sure everything was finished in place for the second test – outlets, covers, etc…) they finished the project off on time because they had called in early enough (as soon as it was ready for a test). They might have even passed originally if the two issues noted at the end were caught earlier; one before the tiles went up & the other back at design or at least during install (the earlier something is caught, the cheaper it is to fix).
 The earlier you catch an issue the better which is one reason why we offer redlining plans &/or air-sealing & insulation inspections. Up in the Naperville, Illinois area? Give us a call to help you in person or virtually. Outside our area? We can always do a virtual walkthrough & consultation with you. Blower Door Testing – Naperville & Surrounding Areas /// Virtual Consultations The earlier you catch an issue the better which is one reason why we offer redlining plans &/or air-sealing & insulation inspections. Up in the Naperville, Illinois area? Give us a call to help you in person or virtually. Outside our area? We can always do a virtual walkthrough & consultation with you. Blower Door Testing – Naperville & Surrounding Areas /// Virtual Consultations |
