 An aerator is most commonly attached to a faucet to not only catch particulates in the water (no one likes sand in their water glass) but more importantly creating a non-splashing stream of water which is generally done by mixing water and air. If you are like most people you don’t think twice about them until the flow starts to slow down to a trickle…
Cleaning the aerator:
- The first step is to gain access to it which can easily be done with a pair of channel locks and a little electrical / duct tape. Wrap the jaws with a little tape so you don’t scratch or damage the surface. (we don’t recommend vice grips as they can distort the body)
- As you look down at the faucet, turn the aerator clockwise & it will unscrew
- Check for any damage to the washer (and if there is take the washer to have it replaced)
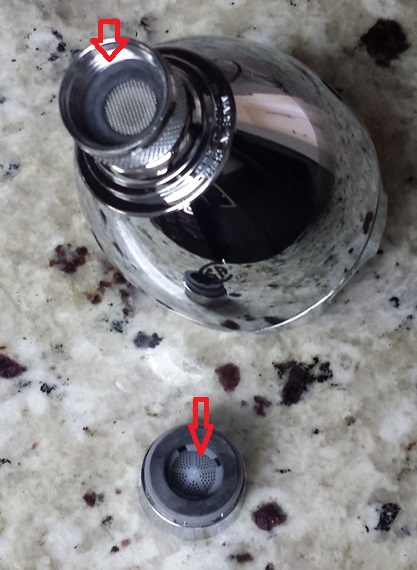
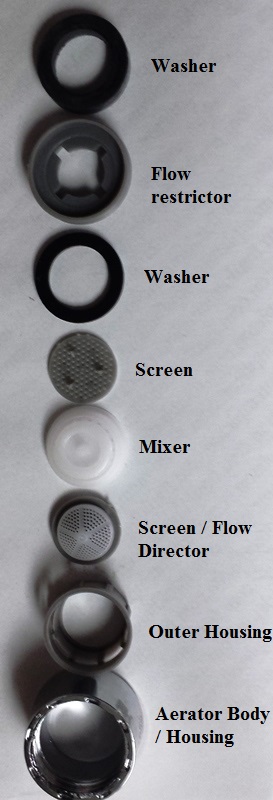
- Pop the washer & screen part out & rinse off. If needed (it doesn’t look like the one above) you may need to disassemble the aerator further – we recommend you snap a picture of the parts laid out so you can reassemble it properly. (See below under “Parts of an Aerator” for one example of this)
- Put the aerator back together
- Turn the tap water on for a few seconds to clean out any other gunk out of the faucet
- Screw the aerator back in by hand (counter clockwise looking at it from above) & then give it a 1/4 of a turn with the channel locks.
- Turn the faucet on to verify you completed everything above properly.
Don’t forget your shower heads:
 Yes even your shower head has a similar setup. In most cases you would simply unscrew it like above, pop the washer out & rinse the screen portion. Reinsert the washer, apply some Teflon tape (if needed) and screw it back.
Parts of an Aerator:
|
FAQ’s:
I have some slime or hard water buildup on mine, how do I clean this up?
The easiest way is to disassemble the pieces & place the affected parts in either vinegar or a cleaner like CLR. Rinse everything off a few hours later and if clean, reassemble like above.
I have water leaking out from around my showerhead or faucet aerator:
This can be caused by a few items – the first thing I would check is the washer. Is it in good shape, not deformed, etc… The second is did you tighten it down properly – you rarely should need to go a 1/4 of a turn but you may wish to see if another quarter of a turn snugs it up better. Make sure the aerator body also wasn’t deformed or cracked – this is rare with most of them but cheaper versions have been known to have issues. The final step is to wrap a few strands of Teflon tape (I personally prefer the brushed on type) & tightening back down
I heard if I want to save water I should buy a new aerator:
This is a good way to save water as many of the older ones allow for 2 or more gallons of water to flow through them a minute (regular faucets) while you can buy replacement ones that only allow .5 of a gallon. For bathrooms it can definitely be well worth it (especially if you like to leave the faucet on while brushing your teeth. For shaving you might actually enjoy the change as the addition of air to the mix creates a better spray to help clean your razor.
There are a few caveats – for kitchens this might not be such a hot idea especially if you are constantly needing to fill pots, pans, the sink, etc… for cooking. The second is it may take longer AKA the “I hate wasting water & it seems like I have to leave the tap on for a few minutes before I get hot water. It only took a minute before…” The catch is you are still wasting the same amount of water, the issue is you are just now stuck waiting longer for it making you think you are wasting more. For a fix I suggest checking out our Fix a leak week piece & a take on another Myth.
 There are quite a few different types of aerators out there. The one I showed above is one of the simplest with most parts combined into a few pieces. The one on the left is of cheaper design which includes numerous parts.