 Nothing can help complete or accentuate the look of a kitchen more than the exhaust hood. Beyond the looks though, it is an important feature for occupant health & safety. Besides helping to eliminate cooking odors, remove excess steam & grease associated with cooking it helps capture numerous other particulates and off gassing from not only the Fuel Source (carbon monoxide), the actual stove / range surface, but even from the pans used. Yes folks, sometimes electric can be worse than gas.
The Codes:
 So for something so important, you would think that there would be a ton of information in the code books… right? Well, think again. There is nothing in the codes that actually require one be installed, much less how to size it. In fact it simply states; Where domestic cooking exhaust equipment is provided… (2018 – 505.2 Domestic cooking exhaust).
The only two main things most people might recall is; Table M1505.4.4 that requires the exhaust flow (if there is one) be a minimum of 100 CFM intermittent or 20 CFM continuous, and M1503.6 that says if it is capable of exhausting MORE than 400 CFM of air, make up air is then required. Sorry but makeup air will have to be left for a future post.
Best Practices:
As stated, the codes don’t really require much & it hasn’t really been till the last few years that people have started looking into and studying kitchen exhaust & ventilation. With that in mind here are some of the best practices that will be covered:
- Level of Use
- Ducted or Recirculating
- Microwave Exhaust Units
- Size of the Hood
- Height of the Hood
- How Many CFM’s are needed
- Some rules of thumb
- Handy chart & example inc.
- Ductwork Sizing / Installation
Level of Use:
With that there is a ton of best practices out there which we will go through, but first, how do you plan on using your stove is an important thing to think of as it can play a factor in many of the items that follow:
- Light Duty – I occasionally use it to heat water, reheat meals, etc… & hey it might get used for Thanksgiving / Christmas gatherings.
- Medium Duty – I use it to cook at least a few times a week & know my way around the stove. I might occasionally fry some food or use the gridle. If I entertain, it generally is with food brought in with maybe an occasional pizza cooked in the oven
- Heavy Duty – I live to cook & try new things, frying chicken is a weekly occurrence or I do some entertaining & have a chef work during the parties (3 to 4 a year)
- Extra Duty – Spicy & aromatic foods, using a wok, BBQ on the gridle – life doesn’t get better than that – darn I should have been or I am a professional chef
Ducted or Recirculating:
I know, really? Well unlike the bathroom exhaust, where they state specifically that recirculating bad smells & moisture is bad, they do allow for recirculating aka ductless range hoods to be used in the kitchen. The mechanical code specifically states;
505.3 Exception: …where installed in accordance with the manufacturer’s instructions and where mechanical or natural ventilation is otherwise provided…listed and labeled ductless range hoods shall not be required to discharge to the outdoors.
While it maybe allowed, we know that hardly anyone is opening a window (like they should) and essentially they are worthless except for maybe task lighting. In most places I have been where they are used & sometimes not even used they are seemingly caked in grease which includes the cabinets above them. Even for those light duty users out there where the kitchen is a gathering spot only I would steer clear of a recirculating hood.
Ducted Microwave or True Exhaust Fan?
Just one step above ductless hoods is the vented microwave. Not only is the capture area way to small, but most are installed improperly &/or don’t work as well as a dedicated exhaust hood even if they are properly installed. The reason I say most are installed improperly is because many don’t change the fan over from recirculating to the ducted position. Even if they do that, many will forget to install the small diverter plate that blocks most of the air from recirculating (assuming one is actually provided). That plate is needed because it blocks the air you thought was all being exhausted from going out through the top or front which is filled with grease.
So with that said, a unit like this can work great for light duty users who don’t want a built in microwave or one sitting on the countertop assuming they make sure to wipe things down after making a heavy or slightly greasy meal. For medium duty users, it can also work out but I would do some major research on just how well that exhaust works .
FYI, make sure you verify that a microwave with built in exhaust can be ducted outside – many I have see are recirculating only & for those that can be exhausted outside, be forewarned that for some it seems to be done as an afterthought as mentioned.
Size of the Hood:
As mentioned many places are finally conducting studies and the biggest item noticed is the size of the unit (aka the capture area) has a big factor on how & what is actually exhausted. I wish I could have taken pictures when I was at the “Gas Technology Institute” who was doing one study that showed this; essentially they had a special light setup to show the fumes & exhaust flows and then how the size & height impacted this.
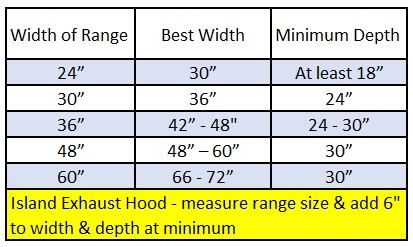
Needless to say, the bigger the hood is, the more it can capture (stuff just doesn’t roll past the edge) & exhaust. The days of having a 30″ range hood that only sticks out only 16 to 18″ for a range size of 30″ x 26″ is fast becoming a very bad practice. Best practice is to have a hood that extends past the range by at least 3″ on each side & to get one almost as deep as you can go or at least one that at least is as deep as the range is. FYI – Commercial applications (except using residential stoves) require 6″ on all sides.
Height of the Hood:
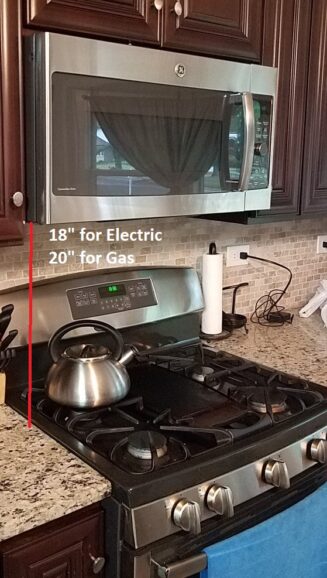 Now wait a minute, I recall that the hood should be only up 18″ for electric and / or 20″ for gas – I am going to bang my head on those large hoods and it will look STUPID, plus hard to reach for….
You are correct – the exhaust hood should be up a MINIMUM of 18″ above the burners, but that is the minimum. The deeper the unit & more CFM’s it can exhaust means the unit can easily move higher – I have seen most people give a range of 28″ to 36″ above the top of the unit.
The height as stated should be based on the depth of the unit and to some lesser extent the amount of CFM’s you are exhausting. For example a generic unit exhausting the minimum 100 CFM could easily be 20 to 24″ above the burner and still work fine. The microwave as shown is limited as it is not as deep & people still need to be able to use it as a microwave.
Now as I am 6′ tall, I prefer that a deeper unit is at least 6′ off the floor so that if I lean in to stir something I don’t hit my head. With that said & this is where a good (or great) kitchen designer can help, you want to make sure that your significant other can actually reach the controls easily, especially with the range on. Generally the maximum height off the floor to the controls should be at 6′ 7″ or lower.
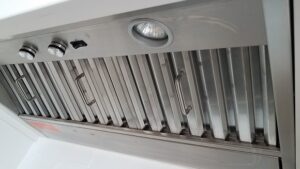 FYI – if you look at the commercial codes, they don’t call out a maximum either, but rather call out that the “Minimum Distance Between the Lowest Edge of a Grease Filter and the Cooking Surface” is 2 1/2′ (30″) above exposed flame or burner & 3 1/2′ (42″) for exposed charcoal & charbroiled type. Table 507.2.8.
How many CFM do I need?
Talk about a loaded question & this is one reason why I mentioned above – what type of user are you, as the answer to this not so simple part can vary. In fact I am going to quote a good friend of mine Michael Anschel from a piece we did on “Green Kitchen Remodeling 11 years ago.”
Properly sized range hood does not mean ‘sized to the recommendation of the stove manufacturer’. Anything over 280cfm is generally not needed. More importantly when you exhaust air at this volume or greater (like the 800 cfm range hoods we see so often) you depressurize the home. This can result in the backdrafting of your heating equipment and bring dangerous flue gas into the home. This is the single most common MISTAKE we see remodelers making. Also consider that you are exhausting conditioned air to the exterior and drawing un-conditioned air into the home. Heated make-up air (almost always required for anything over 300cfm)uses electricity (dirty energy) to temper the make-up air.
FYI – make up air as mentioned above per codes is only required for units capable of over 400 CFM of Exhaust unless changed by your AHJ. Now in his case make up air is required if you are above 300 CFM. Even if you follow most manufacturers instructions, you should crack open a window any time you turn the stove on but that won’t qualify for make up air if you have a large unit.
Rules of Thumb:
I can’t agree more with Michael’s thoughts above, especially for those “Light” to “Medium” users out there. With that there are a few other “rules of thumb” for appropriate sizing.
- What does the manufacturer state? In most cases they will use the rule below with everything going full blast – highly unlikely most of us will ever have everything blazing away on high with all the pots uncovered but they like to play it safe (especially if they also sell hoods)
- The infamous 1 CFM of air per 100 BTU’s
- Is that all burners going full bore at once or? – Most gas ranges come in with burners ranging from 5,000 BTU’s to 13,000 BTU’s per burner where you might decide on your worse day you might be using just 21,000 BTU’s (210 CFM) while someone with a 5′ Viking range really humming can come in at 136,700 BTU’s (1367 CFM Exhaust) – yeah, talk about a large gas line & a lot of air…
- Electric or Induction – Amazingly there is no chart for these so one can always do the math, where 1 watt is equal to 3.412142 BTUs per hour. A generic stove well say has 2 2400 & 1500 watt elements so that comes out to 26,614.7 BTU’s assuming all 4 burners on full (266 CFM)
- Another popular version is the 100 CFM per foot of oven width for wall units (though I do think the 10 CFM per inch or 120 CFM per foot is a better method). So for a typical 30″ range (2.5′) you are at 250 to 300 CFM
- Got an island? Then it typically goes to 15 CFM per LF or 375 CFM for the hood. With that the size equation should overhang the unit 3″ on all 4 sides at minimum
- One of my least popular thoughts is you should exhaust the air in the kitchen 15 times an hour. That might be fine for when kitchens were shoehorned in the back of the house
- For example a 10×15 kitchen with 8′ ceilings would need 300 CFM (10 * 15 * 8′ = 1200 SF / 4 (15 ACH means turning the air over every 4 minutes)
- Todays modern houses might mean a 20×40 great room with 20′ tall vaulted ceiling. That would mean 4,000 CFM of exhaust needed for the same type of cooking – nice try but no dice. Shoot even if you used “Commercial” sizing for Extra Heavy Duty use with a 5′ range that only comes in at 3,300 CFM – 550 CFM per LF of wall mounted canopy @ 6′)
- One other is based on usage & the Square Footage of the hood itself
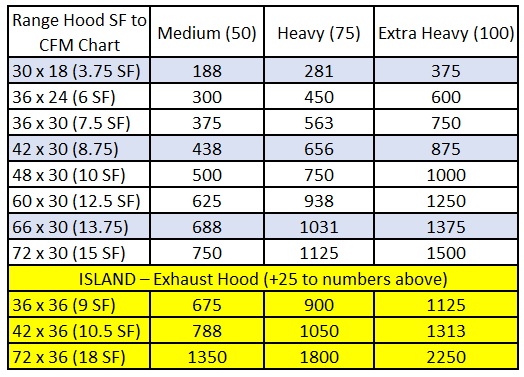
Adding it all together:
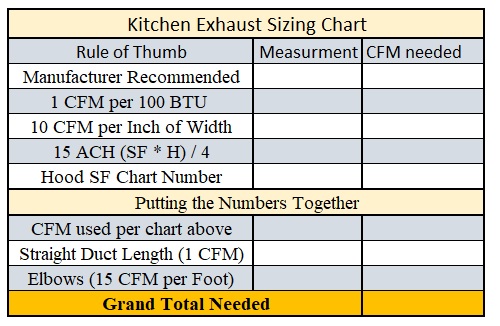
Essentially you should look at all the numbers above & as any hood manufacturer will say – select the largest one. Personally as stated some of those can be to large, so if a number comes in super high (i.e. the ACH one) as compared to the rest you might wish to go with the second highest or maybe even an average. With that, if the ACH sizing number is lower than the others, you will probably have issues selecting one that is rated higher than that. Here is a fillable chart you can use to crunch your numbers & no worries, we will get to that second section in just a few more paragraphs.
FYI – One other quick gut check is to compare it to the “commercial” exhaust rates shown in the table below. With the exception of a few “Extra Duty” users talked about above, you should not come out above the numbers in the commercial “Light Duty” where a 6′ Hood (wall mounted canopy) for the infamous 5′ Viking range only comes in at 1200 CFM not the 1300+ based on the BTU measurement.
Once you have your hood cfm’s required, you then need to account for friction losses of the ducts. The general rule of thumb for this is to add 1 CFM per every LF of duct & 15 CFM for each elbow (some manufacturers state 25). So for a single story house where it goes straight through the attic & out the roof you might be looking at an additional 8 CFM (assuming outside wall placement) whereas a 2 story might be 18 (going straight up & out) or maybe even 16 for installing a simple elbow & going out the side of the house. (We covered a lot of this math in the Dryer Exhaust)
Sample Sizing Example:
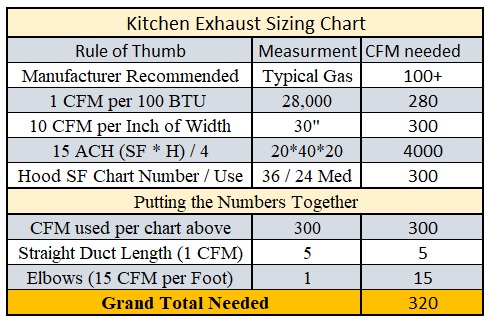
This is a sample one I did off a generic gas range. In this case the manufacturer just said hey, you just need a generic exhaust fan. You may also notice that on this chart it is listed as “inch of width” instead of the 10 CFM per foot – I just feel the other one is easier but you can easily substitute your own number. Yes I used that large room example just to show how ridiculous the ACH number can be. Remember the object is not to evacuate all the air in the kitchen, just the stuff in the the cooking area. Finally for the hood, I went with the best practice of oversizing it by 3″ & as this one is on the wall & it’s not an island…
Essentially I could go with either 280 or 300 but I opted for the larger. The duct run would travel up for a foot or so, make a bend & then exhaust outside which when added together gave me a CFM value of 320 needed in this example. But wait, I can’t find a 320 CFM fan – say only a 300, 350 or maybe even a 400 CFM one that I like the look of. Well you could probably get away with any of those. The number given is just a target. Now lets say you needed to exhaust out over 20+ feet, then I would definitely rule out the smaller one & say go with the 350 or 400 CFM one. (Now if I lived in Michael’s area – yes I would have gone with 280/300)
Ductwork:
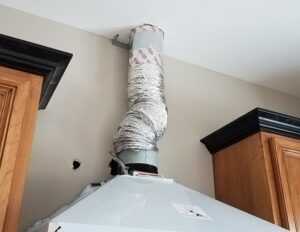 Heh anyone want to tell me what is wrong with this picture? I can tell you that just like most Bathroom exhausts it wasn’t exhausting at it’s peak for one. Without consulting the codes, does anyone really think that flex line is the optimal surface for a system that collects & exhausts grease?
Well it isn’t & not allowed per M1503.3. It must be smooth, air tight, not tied into another exhaust, have a back draft damper & MUST vent outside. Going to 1503.4 it states specifically that the exhaust duct must be galvanized, stainless, or copper.
 Unfortunately most Building Inspectors & even home inspectors would ever catch this, as this picture is what they would see upon inspection. So be forewarned & if you have someone doing a remodel project or building you a new house, make sure you check in during the process. Last thing you want to do is find out after a fire.
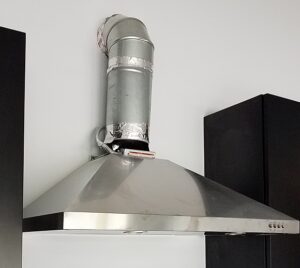 Yes this one is much better though I would recommend all seams are taped or have mastic applied just like your HVAC ducts to help make it air tight.
.
.
.
.
Sizing the Duct:
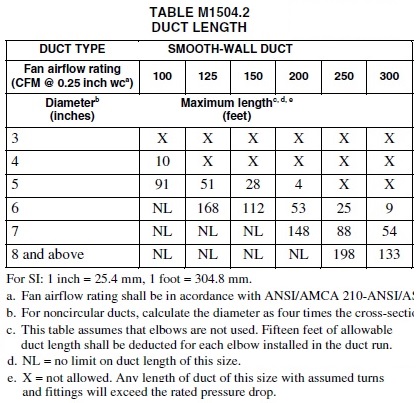 Good luck finding a duct sizing chart out there for kitchen exhausts. The closest thing one can find is the following chart which as you can see stops at 300 cfm. (The unmodified version shows flex duct which is not allowed.) This table shows the maximum length that is allowed based on the size of the pipe. So a traditional 4″ pipe with no elbows can only be run 10′ for an exhaust fan pushing 100 CFM. That same 4″ pipe is not allowed for any exhaust fans larger than that & you would have to step up your size.
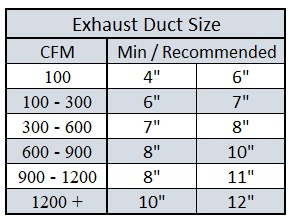 Fortunately most hood manufacturers have already figured out the optimal size & restrictions – so follow there directions, but if they haven’t here is a handy chart.
But wait… I have a 200 CFM fan & the manufacturer states that 4″ pipe can be used. Well that can be allowable as long as it is listed & you follow all the manufacturers directions. Just make sure you have the installation instructions handy when the code official shows up or they will fail you.
In Closing:
I know there is a lot of information above, but the biggest thing is to make sure you use it. An exhaust fan can’t do what it is supposed to do if you don’t turn it on. I recommend turning it on just before you reach for that knob. If sized properly after you have turned the burner off, you should be able to kill the exhaust within a minute or two. While under sizing is not recommended, neither is over sizing a unit – remember you just need to exhaust the fumes & stuff from cooking, not the entire house.
Questions, Comments or Concerns – please leave us a comment below.


